
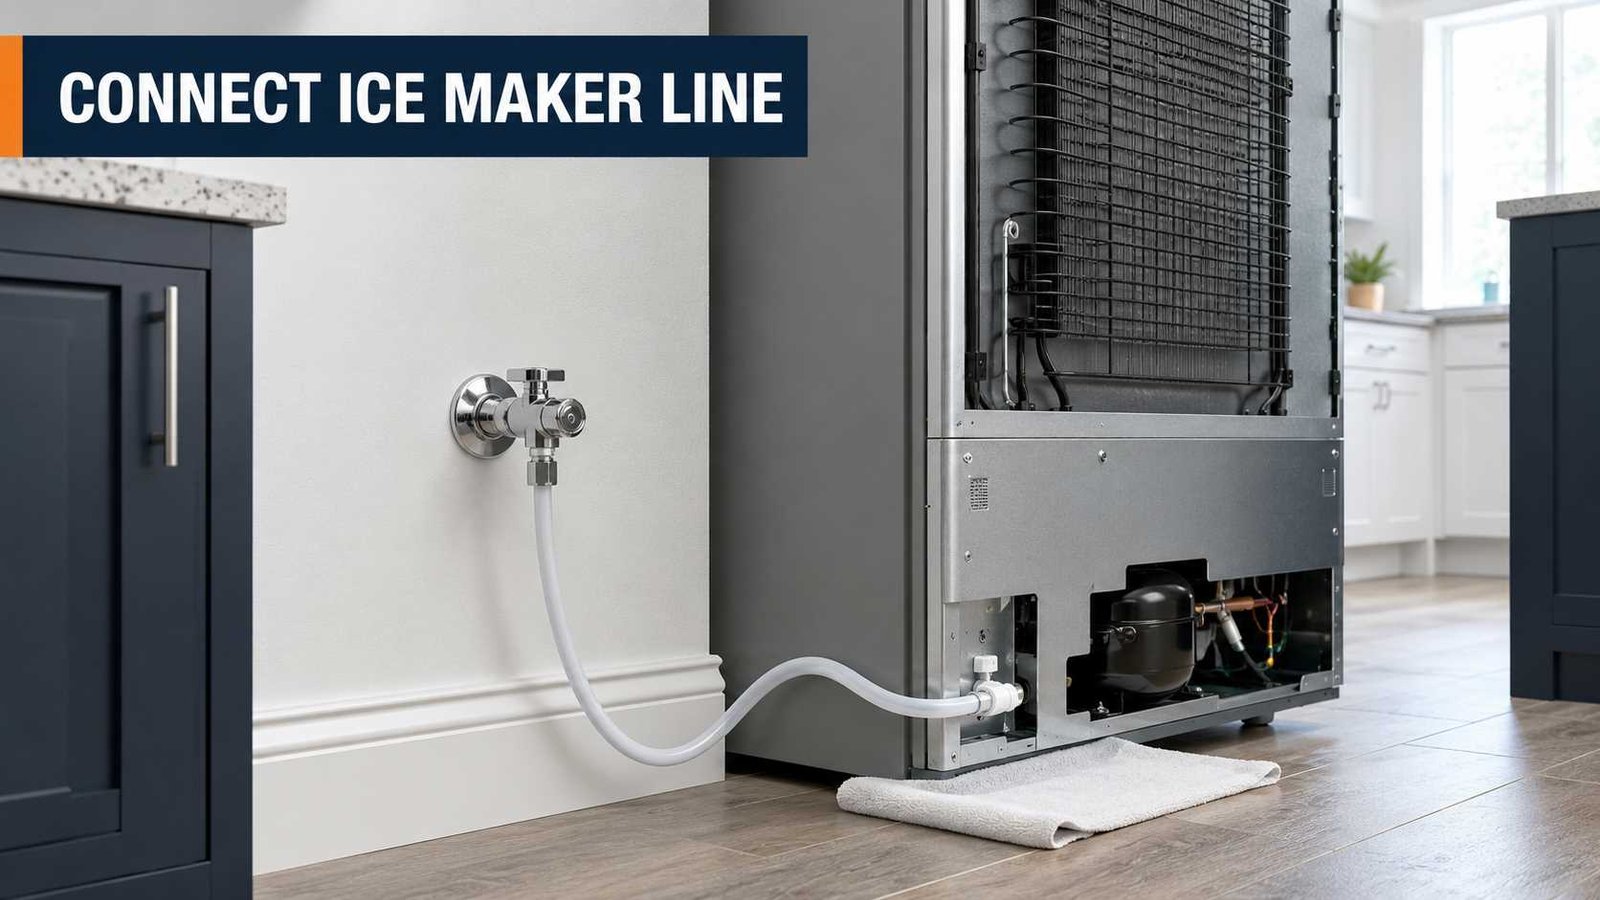
 To connect an ice maker water line, you normally run an approved refrigerator supply tube from a cold potable-water shutoff valve to the water inlet at the back of the refrigerator. Turn off the water and disconnect refrigerator power before making the final connection. Flush a new supply line before attaching it to the refrigerator, tighten the fitting without overtightening it, turn the water back on slowly, and check carefully for leaks.
A 1/4-inch outside-diameter line is common, but do not assume every refrigerator uses the same tubing, fittings, or water-pressure range. Check the installation manual for your exact model first. If you need to cut into household plumbing or install a new shutoff valve, using a qualified plumber is the safer choice.
| Item | What to know |
|---|---|
| Water source | Cold potable water |
| Common supply-line size | 1/4-inch OD on many refrigerators |
| Common materials | Copper or PEX on many models |
| First safety step | Shut off water and disconnect refrigerator power |
| Flush new tubing? | Yes, where instructed by the manufacturer |
| Leave extra tubing? | Yes, leave a service loop |
| Main installation risk | Leaks, kinks, crushed tubing, wrong fittings |
| Ice immediately after hookup? | Usually not |
| New household plumbing needed? | Consider a qualified plumber |
| Final authority | Your refrigerator’s installation manual |
How an Ice Maker Water Line Connects
The basic water path is simple:
Cold household water → shutoff valve → refrigerator supply line → refrigerator water inlet → internal valve/filter → ice maker
Many refrigerators with an automatic ice maker also use the same incoming water supply for the drinking-water dispenser.
Whirlpool says the refrigerator water supply is normally connected to a cold-water source using 1/4-inch OD copper or PEX tubing on applicable models. LG’s general US installation guide also describes a standard 1/4-inch water line connected to cold water.
The exact connection at the back of the refrigerator can differ. Never remove fittings, cut factory tubing, or improvise adapters until you have checked the installation diagram for your model.
Before You Start, Check the Refrigerator Manual
A few minutes with the manual can prevent a leak later.
Confirm That the Refrigerator Is Plumbed
Not every refrigerator with a water feature connects directly to household plumbing.
Some refrigerators use a refillable internal water tank. This arrangement is more common on certain models sold outside North America.
If your refrigerator is non-plumbed, you do not need to install a household ice-maker supply line.
Check the Required Tubing
A 1/4-inch OD line is very common, but manufacturer instructions take priority.
Whirlpool says many of its refrigerators can use 1/4-inch soft copper or PEX tubing. Samsung’s US guidance recommends a 1/4-inch copper installation kit for its general water-line setup and describes a different connection arrangement when approved plastic tubing is used.
Check Water Pressure
Do not use one internet water-pressure figure for every refrigerator.
For example, LG’s general US water-line guide specifies 20 to 120 psi for the refrigerator installation it covers. A Whirlpool manual for another product family specifies 35 to 120 psi. Samsung’s US general guide says its ice maker requires at least 30 psi.
That difference is exactly why your model manual matters.
Find the Refrigerator Water Inlet
Pull the refrigerator forward carefully and inspect the lower rear area.
Depending on the design, you may find:
- A threaded inlet fitting
- A short factory water tube
- A compression connection
- A push-style connector
- More than one factory water tube
Do not assume that two similar-looking tubes can be connected interchangeably. Samsung specifically warns that RS27T and RS22T refrigerators have two water lines and that cross-connecting them can stop the ice and water functions from working correctly.
What You Need
For a refrigerator that already has a suitable shutoff valve nearby, you may need:
- Approved refrigerator water tubing
- Correct compression nut or connector
- Ferrule or sleeve if required
- Adjustable wrench
- Second wrench where needed to hold the fitting
- Bucket or large container
- Dry towels
- Flashlight
- Refrigerator installation manual
Do not buy fittings only because they look like the old ones. Match the tubing diameter and connection style specified for the refrigerator.
Copper vs PEX vs Braided Refrigerator Water Lines
| Line type | Main advantage | Main concern | What to check |
|---|---|---|---|
| Soft copper | Common in manufacturer instructions | Can kink if bent sharply | Correct OD and fittings |
| PEX | Flexible and easier to route | Connector requirements vary | Confirm model compatibility |
| Braided supply hose | Flexible and protected | Not specified for every refrigerator | Use only if approved for the installation |
| Generic plastic tubing | Easy to route | Connection ends may require a special molded fitting | Follow manufacturer instructions exactly |
Whirlpool currently states that copper or PEX tubing can be acceptable on applicable refrigerators. Samsung’s US instructions describe both copper and plastic arrangements but say plastic tubing without the required molded end should not be used.
If your manual does not mention the tubing you plan to use, check with the manufacturer before installing it.
How to Connect the Ice Maker Water Line
The steps below assume that a suitable existing cold-water shutoff valve is already available.
If you have no refrigerator water outlet or shutoff valve, skip to the section on installing a new water supply.
Step 1: Turn the Ice Maker Off
If the refrigerator has already been powered without a water connection, switch the ice maker off before installation.
Whirlpool and LG both give this type of instruction for refrigerators operating before a water supply has been connected.
Step 2: Disconnect Refrigerator Power
Unplug the refrigerator before making the final water connection.
You are working with water close to an electrical appliance, so keeping the refrigerator disconnected during the hookup is a sensible safety step and is specifically included in manufacturer instructions.
Step 3: Shut Off the Water
Close the refrigerator’s existing cold-water shutoff valve.
If you are working on the household water connection itself, the main supply may also need to be shut off.
Do not disconnect a pressurized line and hope the valve will stop the water afterward.
Step 4: Route the Tubing to the Refrigerator
Run the line toward the refrigerator without:
- Sharp bends
- Tight loops
- Pinched sections
- Contact with sharp metal edges
- Placing tubing where the refrigerator wheel can crush it
Leave enough extra tubing behind the refrigerator so the appliance can be pulled forward later.
Whirlpool specifically recommends a service loop for cleaning and servicing.
Step 5: Connect the Line to the Existing Shutoff Valve
The exact procedure depends on your valve and tubing.
With a traditional copper compression connection, the tubing commonly passes through a compression nut and sleeve or ferrule before being seated squarely in the valve outlet.
Start threaded fittings carefully by hand whenever possible. If the nut immediately feels difficult to turn, stop and check the alignment. Cross-threading a fitting can create a leak.
Do not use the generic steps in this guide to replace instructions supplied with your valve or refrigerator connection kit.
Step 6: Flush the Supply Line
Before connecting the free end to the refrigerator, place it in a bucket or sink.
Open the water supply and allow water to run through the new line until it runs clear. Shut the water off again before making the final refrigerator connection.
Both Whirlpool and LG include this flushing step in their installation instructions.
Flushing helps remove debris that may have entered the tubing during installation.
Step 7: Connect the Line to the Refrigerator
Locate the refrigerator inlet.
Install the nut, sleeve, ferrule, adapter, or other connector required by your model.
Seat the tubing fully and squarely in the fitting before tightening it.
LG instructs users to insert the supply tube into the refrigerator connection as far as possible before securing the fitting. Samsung likewise provides specific arrangements for copper and plastic tubing.
Step 8: Do Not Overtighten the Fitting
Tighter does not always mean safer.
A compression fitting must be tight enough to seal, but forcing it beyond the required point can damage the fitting or tubing.
Samsung specifically warns that overtightening can cause a leak. Whirlpool installation instructions also warn against overtightening compression nuts.
If a properly assembled connection continues leaking, repeatedly applying more force is not a good repair method.
Step 9: Turn the Water Back On Slowly
Open the water valve.
Watch the refrigerator connection and the household shutoff-valve connection as pressure returns to the tubing.
Keep a dry towel underneath. Even a small drop becomes easy to see against dry material.
Step 10: Check Every Connection for Leaks
Inspect:
- The household shutoff valve
- The fitting connected to the valve
- Any intermediate couplers
- Filter connections, if external
- The refrigerator inlet connection
If you see water, shut the supply off before correcting the connection.
Both LG and Samsung explicitly instruct users to check for leakage after restoring water pressure.
Step 11: Carefully Push the Refrigerator Back
This step causes many hidden problems.
Watch the supply line while moving the refrigerator. Make sure it forms a relaxed loop instead of folding sharply or becoming trapped under the appliance.
Whirlpool notes that kinks in the supply line can restrict water flow.
Once the refrigerator is in its normal position, check the line again if you can safely see it.
Step 12: Restore Power and Turn the Ice Maker On
Plug the refrigerator back in.
Turn the ice maker on according to your model’s instructions.
If your refrigerator has a water dispenser, flush the internal water system according to the manufacturer’s directions before drinking the water.
Do not assume that ice should appear immediately.
How Much Water Should You Flush?
There is no universal flushing amount.
Examples show how much manufacturer instructions can differ:
- LG’s US general guide tells users to dispense at least 2 gallons after installation.
- Samsung US says to dispense 1 gallon on the installation page we reviewed.
- Samsung Australia tells users of the applicable refrigerators to flush about 10 litres or run the dispenser for 6 to 7 minutes.
Follow your own refrigerator manual rather than selecting one of these amounts at random.
What If There Is No Water Valve Behind the Refrigerator?
This changes the job.
Connecting a refrigerator to an existing shutoff valve is not the same as creating a new branch from household plumbing.
A new installation may require:
- Selecting an appropriate cold potable-water pipe
- Installing an approved shutoff valve
- Cutting or modifying household pipework
- Routing tubing through cabinets, floors, or walls
- Checking local plumbing requirements
If those steps are required, a qualified plumber is often the sensible choice.
LG states that household water-supply arrangements vary and strongly recommends contacting a qualified plumber when the water supply needs modification. Samsung UK recommends qualified assistance when connecting a refrigerator water line.
Be Careful With Saddle-Valve Advice
Older refrigerator installation guides and some current support material describe saddle-style connections, so you may see them in videos and older DIY articles.
However, current Whirlpool guidance for applicable refrigerators specifically warns against piercing-type or 3/16-inch saddle valves, saying they can reduce water flow and clog more easily. Local plumbing requirements can also differ.
For a new household connection, use the type of shutoff valve permitted by your refrigerator instructions and local plumbing rules.
How Much Extra Water Line Should You Leave?
Do not stretch the tubing tightly between the wall and refrigerator.
Leave enough slack for the refrigerator to move forward without pulling on either connection.
Whirlpool describes this extra tubing as a service loop. Older LG installation documentation similarly calls for enough extra tubing to allow the refrigerator to move away from the wall.
The loop should be wide and relaxed.
Avoid:
- Tight coils
- Sharp 90-degree bends
- Tubing pressed against a compressor area
- Tubing trapped under wheels
- Tubing rubbing against sharp sheet metal
When Will the Ice Maker Start Making Ice?
Not immediately.
The refrigerator must cool the freezer and ice-maker area before normal ice production can begin.
LG says it may take up to 24 hours for the ice maker to begin producing ice after installation. Exact timing varies with refrigerator design, room temperature, freezer temperature, door openings, and other conditions.
Some manufacturers also recommend discarding an initial quantity of ice after a new water connection. Follow your model manual for the exact amount.
Ice Maker Not Working After Connecting the Water Line
A new connection does not always mean an appliance fault.
Check the simple things first.
1. Make Sure the Water Valve Is Fully Open
A partly closed valve can restrict water flow.
2. Check the Supply Line for Kinks
Look behind the refrigerator.
A crushed or sharply bent line can reduce flow enough to affect both the dispenser and ice production. Whirlpool identifies kinks as a common water-supply-line problem.
3. Make Sure the Ice Maker Is On
It may still be in the OFF position from installation.
Use your refrigerator manual because ice-maker controls vary by model.
4. Allow the Refrigerator to Cool
A warm newly installed refrigerator may not produce ice yet.
Give the appliance time to reach its normal operating temperature.
5. Check the Water Filter
If the refrigerator uses an internal filter, make sure it is installed and seated correctly.
A blocked or incorrectly installed filter can restrict water flow.
6. Consider Low Water Pressure
If the water dispenser is unusually slow and the supply valve is fully open, pressure may be too low.
Do not attempt to adjust household pressure regulators unless you are qualified to do so. A plumber can measure the supply and compare it with the requirement in your refrigerator manual.
7. Check Model-Specific Water Connections
This is especially important after door removal, delivery, or installation.
Samsung notes that its RS27T and RS22T refrigerators use two water lines that must not be cross-connected.
If the household supply is working correctly but the refrigerator still does not fill with water, appliance diagnosis may be required.
Refrigerator Water Line Leaking After Installation
A leak should be dealt with immediately rather than monitored for several days.
Leak at the Shutoff Valve
Shut the water off and check whether the leak is coming from:
- The valve body
- The valve stem
- The tubing connection
- The household plumbing joint
A leaking household valve may require a plumber.
Leak at the Refrigerator Connection
Possible installation causes include:
- Tubing not fully seated
- Wrong fitting
- Missing ferrule or sleeve
- Damaged tubing end
- Cross-threaded compression nut
- Overtightened fitting
- Incompatible tubing
Do not continue tightening indefinitely.
Leak Appears Only After Moving the Fridge
Pull the appliance forward carefully and check whether the tubing was crushed, stretched, or kinked.
Correct the routing before returning the refrigerator to position.
Regional and Model Differences
United States and Canada
Quarter-inch refrigerator supply tubing is common, with copper and PEX accepted on many products. Exact connection hardware and water-pressure requirements still vary by model.
United Kingdom and Ireland
Check whether the refrigerator is plumbed or uses a refillable tank.
Samsung UK recommends seeking assistance from a qualified technician for its refrigerator water-line connection guidance.
Australia and New Zealand
Pay particular attention to manufacturer and local installation requirements.
Samsung Australia’s current instructions for the models covered by its dispenser setup guide state that the water line must be connected by a qualified technician. The same guidance requires connection to cold potable water and warns against bent, pinched, or squashed water tubing.
The safe approach is simple: follow the regional manual supplied for the exact refrigerator rather than applying US installation instructions to an Australian, New Zealand, UK, or Irish model.
When Should You Call a Plumber?
Call a qualified plumber when:
- No suitable refrigerator shutoff valve exists.
- Household plumbing needs to be cut or modified.
- The existing valve is corroded or leaking.
- You are unsure whether a valve complies with local plumbing requirements.
- Household water pressure appears abnormal.
- A new connection repeatedly leaks.
- Water must be routed through walls or floors.
- Regional manufacturer instructions require qualified installation.
Call an appliance technician when the household water supply is correct but the refrigerator itself still does not receive water.
Possible appliance-side problems can involve the inlet valve, internal tubing, filter system, ice maker, controls, or sensors. Those problems require model-specific diagnosis.
Safety warning: Stop troubleshooting if the job requires opening electrical panels, testing live electrical circuits, disassembling internal refrigerator wiring, working on refrigerant components, or bypassing safety devices. Shut off the water if a connection leaks.
Frequently Asked Questions
What size water line does an ice maker use?
A 1/4-inch outside-diameter line is common on refrigerators sold in North America. Whirlpool, LG, and Samsung all reference 1/4-inch tubing in general installation guidance, but check your exact refrigerator manual before buying tubing or fittings.
Does an ice maker connect to hot or cold water?
Connect the refrigerator to a cold potable-water supply unless the manufacturer specifically states otherwise. Whirlpool, LG, and Samsung guidance reviewed for this article specifies cold water.
Can I use PEX for a refrigerator water line?
On many models, yes. Whirlpool specifically lists 1/4-inch OD PEX as acceptable on applicable refrigerators. Other brands and models may specify different tubing, so check the manual before installation.
How tight should the refrigerator water fitting be?
It should be secure enough to seal without being forced excessively. Manufacturer instructions from Whirlpool and Samsung warn against overtightening compression connections. If a connection leaks despite correct assembly, shut off the water and investigate the fitting instead of simply applying more force.
Why is my new ice maker not making ice?
First check that the shutoff valve is fully open, the supply line is not kinked, the ice maker is switched on, the water filter is correctly installed, and the refrigerator has had enough time to cool. LG notes that initial ice production can take up to 24 hours.
Do I need a plumber to install an ice maker line?
Not necessarily if a suitable refrigerator shutoff valve already exists and your manufacturer permits homeowner connection. If household plumbing must be cut, altered, or extended, using a qualified plumber is safer. LG recommends a qualified plumber when the home’s water supply needs modification, while Samsung Australia requires qualified installation for the models covered by its Australian guide.
Should I flush the water line before connecting it to the refrigerator?
Manufacturer instructions commonly call for flushing a newly installed supply tube before the final refrigerator connection. Whirlpool and LG both instruct users to run water through the tubing until it is clear.
Can I use the same water line from my old refrigerator?
Possibly, but inspect it carefully first. Do not reuse tubing that is damaged, kinked, brittle, leaking, contaminated, or incompatible with the new refrigerator. Some regional manufacturer instructions require new hose sets, so check the installation manual for the new appliance before reusing anything. Samsung Australia, for example, says new supplied hose sets should be used for the refrigerator setup covered by its guide۔
Daniel Brooks is a US-based appliance troubleshooting researcher with 12 years of experience studying washer, dryer, refrigerator, and dishwasher faults. He reviews manufacturer manuals and converts technical error codes into safe, practical guidance for homeowners.