
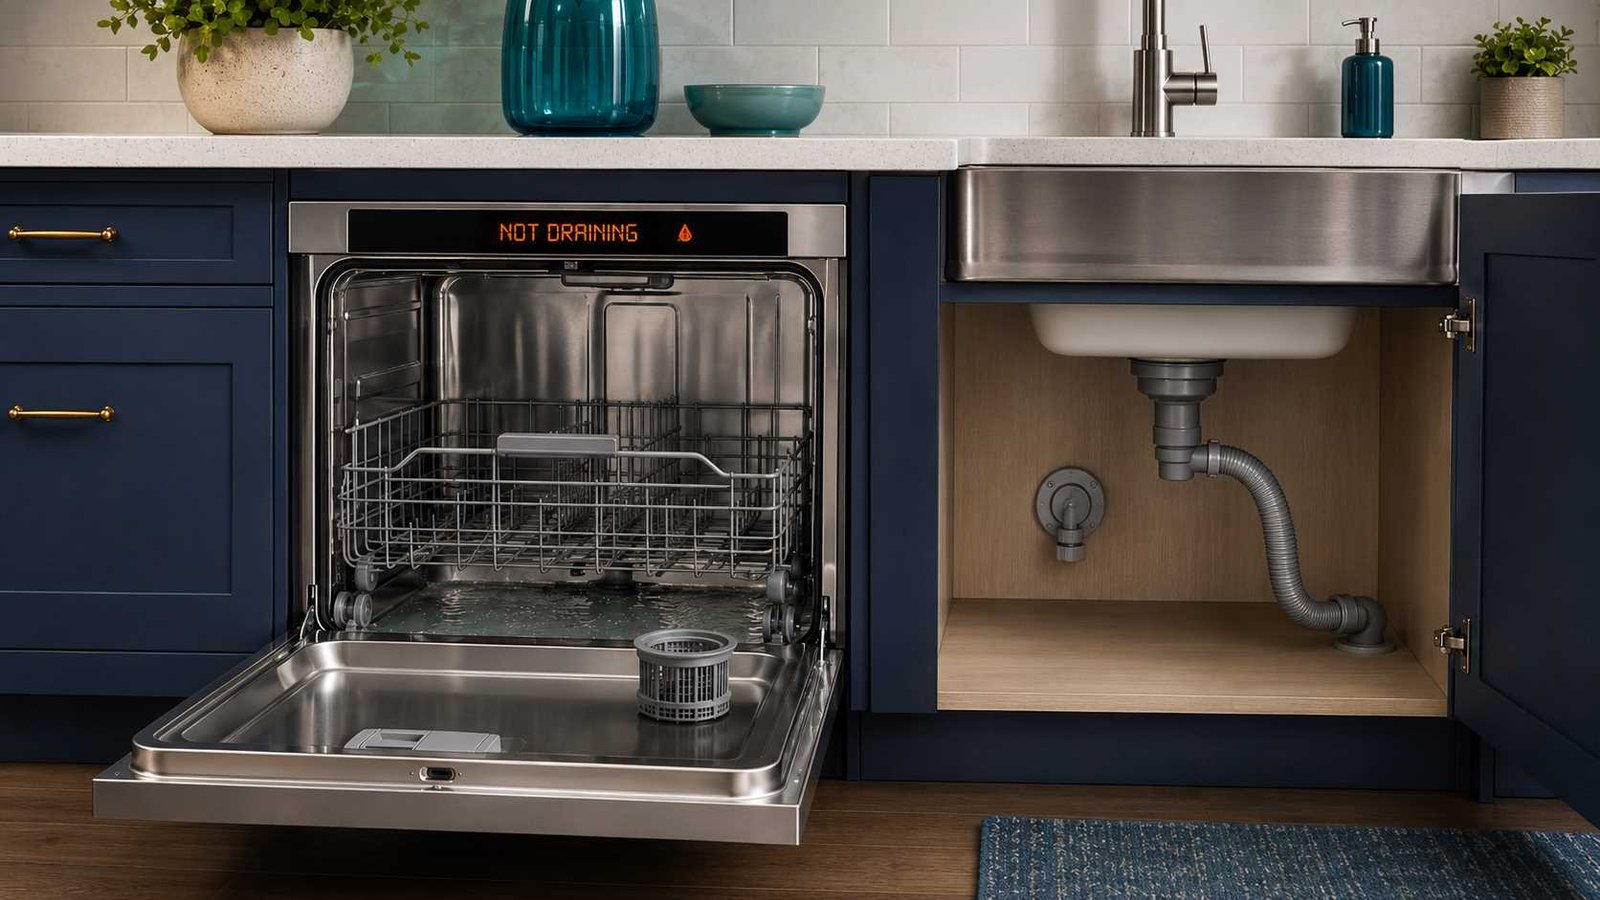
 A dishwasher not draining usually means water cannot move freely from the filter and sump through the drain hose and into the household waste pipe. Common causes include food trapped in the filter, a blocked sink connection, a kinked hose, an installation problem, or an obstructed drain pump.
Start by checking whether the cycle finished, whether the kitchen sink drains normally, and whether the dishwasher filter contains visible debris. Do not continue running the appliance when water is close to the door, leaking underneath the machine, producing a burning smell, or repeatedly tripping the breaker.
A small amount of clean water below the filter can be normal on some models. Water covering the filter, spreading across the tub floor, or remaining after repeated cycles usually needs attention.
| Item | Answer |
|---|---|
| Problem | Dishwasher does not empty completely |
| Most common causes | Clogged filter, blocked sump, kinked hose, blocked sink connection or installation fault |
| Safe first check | Confirm the cycle finished, test the sink drain and inspect the filter |
| Repair difficulty | Easy for basic cleaning; moderate to advanced for hose, pump or electrical faults |
| Can it still be used? | Avoid further cycles if substantial or dirty water remains |
| Professional help needed | When basic checks fail, the pump is silent, the machine leaks, or an error returns |
| Relevant error codes | Vary by brand and model |
Is Water in the Bottom of a Dishwasher Normal?
Not every visible drop of water indicates a fault.
On some dishwashers, a small amount of water remains inside the recessed filter area to prevent seals from drying. It may only become visible when the filter is removed. Maytag describes water approximately halfway up the filter area as normal on applicable models.
A drainage problem is more likely when:
- Water covers the filter screen
- Water spreads across the flat tub floor
- Water reaches close to the door opening
- Dirty water returns several hours after the cycle
- The dishwasher smells because old water remains
- A drain-related error appears
- The cycle stops before emptying
- Water comes out of an air gap beside the sink
The expected water level varies. Check the user manual before assuming that a small amount beneath the filter is abnormal.
How a Dishwasher Drains
At the end of a wash or rinse stage, the dishwasher activates its drain pump. The pump moves water from the sump through the drain hose and into a sink tailpiece, garbage disposal, air-gap system, siphon connection, standpipe or another approved household drain.
A high loop or air gap may be used to reduce the risk of dirty sink water flowing back into the dishwasher. The required arrangement depends on the installation instructions and local plumbing rules.
The main parts of the drainage path are:
- Filter: Captures food particles and debris.
- Sump: The recessed area beneath or around the filter.
- Drain pump: Pushes water out of the appliance.
- Drain hose: Carries water to the household drain.
- Sink connection: May be a garbage disposal, tailpiece, spigot or siphon trap.
- Backflow prevention: May use an air gap, high loop or non-return valve.
A restriction at any point can leave water inside the machine.
Most Common Reasons a Dishwasher Will Not Drain
1. The cycle did not finish
A power interruption, opened door, control problem or cancelled programme can stop the dishwasher before its final drain.
Check the display for a paused cycle, flashing indicator or error code. Close the door firmly and use the model’s documented Cancel, Reset or Drain function.
There is no universal button sequence for every dishwasher. Use the control instructions printed on the panel or in the model manual.
2. The filter is clogged
Food residue, paper labels, grease and small fragments can restrict water around the filter. Remove and clean the filter only according to the model instructions.
Some filters twist out, while others use several pieces. Some machines have self-cleaning systems and do not use a conventional removable cylindrical filter. LG specifically notes that filter design and removal procedures differ between models.
3. Debris is trapped in the sump
Food, broken glass, fruit stones, plastic fragments or pieces of crockery can enter the area below the filter.
Only inspect areas that the user manual identifies as homeowner-accessible. Wear protective gloves because glass can be difficult to see in standing water or near a pump impeller. Miele specifically warns about hidden glass splinters in the drain-pump area.
4. The kitchen sink or household drain is blocked
A dishwasher may be working correctly but have nowhere to send the water.
Run the connected kitchen tap for around 30 seconds. When the sink drains slowly, backs up or gurgles heavily, the problem may be in the household plumbing rather than the dishwasher. Samsung recommends contacting a plumber when the connected sink does not drain normally.
5. The garbage-disposal knockout plug remains installed
In many North American installations, the dishwasher hose connects to a garbage disposal. A new disposal normally has a plug closing the dishwasher inlet.
If the plug was not removed during installation, the dishwasher cannot pump water into the disposal. This is especially likely when the problem started after a new dishwasher or disposal was installed.
Ask the installer or a plumber to correct the connection when you are not familiar with disposal installation.
6. The drain hose is kinked or crushed
Stored items under the sink can press against the hose. A newly fitted dishwasher may also have been pushed back onto its own hose.
Inspect the visible hose for:
- Sharp bends
- Flattened sections
- Pinching behind the appliance
- Damage or cracking
- A low sag that collects dirty water
- Incorrect routing after plumbing work
Samsung identifies a pinched hose beneath a newly installed dishwasher as a common installation-related cause.
Do not pull the dishwasher out unless you can do so without damaging the floor, water line, wiring or cabinetry.
7. The air gap or sink connection is obstructed
Some North American installations have a small air-gap fitting beside the faucet. Food residue can block the fitting or the hose running from it to the disposal.
Water overflowing from the air gap usually points to a downstream restriction between the air gap and household drain.
In the UK and Ireland, a dishwasher may connect to a sink spigot or siphon trap. Electrolux advises checking that the spigot is clear and that the blanking plug has been removed after a new installation or relocation.
8. The drain pump is obstructed or damaged
A humming sound without water movement may suggest that the pump impeller is obstructed. Grinding or rattling can indicate hard debris around the pump.
These sounds are clues, not proof that the pump needs replacing. A blockage, loose pump cover or restricted hose can produce similar symptoms. Whirlpool and Bosch both identify pump obstructions, loose covers and hose restrictions as possible causes.
9. The non-return valve is stuck or incorrectly fitted
Selected models use a removable non-return valve near the drain pump. If it is blocked, damaged or incorrectly positioned, water may remain in the tub or return after being pumped out.
This part is not identical across brands. Only remove it when the model manual provides a specific homeowner procedure. Miele lists an incorrectly positioned non-return valve as one possible cause of F11 on selected models.
10. An electrical or control fault is preventing drainage
Less common possibilities include:
- Failed drain pump
- Damaged pump wiring
- Door-switch problem
- Timer fault on an older dishwasher
- Drain-solenoid fault on selected older designs
- Water-level or pressure-sensing problem
- Electronic control fault
These possibilities require model-specific diagnosis. Do not use live-voltage testing or bypass a door switch, flood sensor or other safety device.
Safety Checks Before Troubleshooting
Before reaching into the filter or sump area:
- Stop the cycle.
- Allow hot water and internal parts to cool.
- Switch off the dishwasher.
- Disconnect the plug or turn off the correct circuit breaker.
- Confirm that the display and lights are off.
- Place towels in front of the appliance.
- Wear protective gloves.
- Keep children and pets away from the work area.
Whirlpool advises isolating the dishwasher at the breaker rather than relying only on the control panel. Stop immediately if you smell burning, find damaged wiring or experience repeated breaker trips.
Warning: Do not pour chemical drain-opening products into the dishwasher. Whirlpool warns that these products can damage dishwasher components and create safety hazards.
Step-by-Step Dishwasher Drain Troubleshooting
Work through these checks in order. Moving directly to pump replacement can waste time when the real problem is a blocked sink connection or kinked hose.
Step 1: Confirm that the cycle ended
Check whether the dishwasher lost power, was paused or had its door opened during operation.
Look for:
- A remaining-time display
- A Start or Resume indicator
- Flashing lights
- An error code
- A control-lock symbol
- A power-failure message
Resume or cancel the cycle according to the model instructions.
Step 2: Try the documented drain function
Many dishwashers have a Cancel/Drain function. The required button and holding time vary by control panel.
Use the procedure in the user manual. Do not copy a reset sequence from another brand or model.
A reset may recover from a temporary control interruption. It will not remove food, straighten a hose or repair a failed pump.
Step 3: Remove excessive standing water
After disconnecting power, remove the lower rack.
Use a cup, sponge, turkey baster or small hand pump to transfer the water into a bucket. Towels placed around the appliance will help contain spills. Whirlpool recommends removing standing water before opening the filter area or working near drain connections.
Do not use an electrical wet vacuum near the dishwasher unless it is rated for wet pickup and can be operated without exposing electrical connections to water.
Step 4: Clean the filter
Follow the user manual because filter construction varies.
A typical process is:
- Remove the lower rack.
- Unlock and lift out the removable filter.
- Remove loose debris.
- Rinse the filter under warm running water.
- Use a soft brush for stuck residue.
- Refit every filter component correctly.
- Confirm that the filter is flat and locked.
Incorrectly installed filter parts may contribute to drainage errors and allow debris to reach the pump. Samsung and LG both stress correct reassembly.
Step 5: Inspect the accessible sump area
With power disconnected and water removed, look for visible debris around the filter opening.
Do not force covers, reach beneath fixed components or use sharp metal tools. Only remove a pump cover or non-return valve when the manual specifically shows how.
Stop when:
- The cover will not release normally
- Wiring becomes visible
- Major disassembly is required
- Broken glass cannot be removed safely
- The impeller appears damaged
- Water is leaking beneath the machine
Step 6: Test the sink drainage
Run water into the connected sink.
- Sink drains normally: Continue checking the dishwasher hose and connection.
- Sink drains slowly or backs up: The household drain may be blocked.
- Both sink and dishwasher contain dirty water: Contact a plumber before replacing dishwasher parts.
Step 7: Check the visible drain connection
Look beneath the sink for the dishwasher hose.
Depending on the country and installation, it may connect to:
- Garbage disposal
- Sink tailpiece
- Air gap
- Waste tee
- Sink spigot
- Siphon trap
- Standpipe
Check for a pinched hose, loose connection or obvious buildup. Do not disconnect the hose unless power and water have been isolated and you are comfortable containing wastewater.
Step 8: Check the hose routing
The hose may require an air gap, high loop or a specified connection height. Exact measurements vary by model and region.
Electrolux, for example, provides model-family limits for hose length and drain-inlet height. These figures should not be applied to unrelated dishwashers. Follow the installation manual supplied with your model.
Step 9: Reassemble and test
After confirming that all accessible parts are clean and correctly fitted:
- Restore the water supply if it was closed.
- Restore electrical power.
- Run a short rinse or drain programme.
- Listen for the drain pump.
- Check the sink connection for leaks.
- Inspect the tub after the programme ends.
Stop the test if water escapes beneath the appliance.
Step 10: Record what happens
Useful information for a technician includes:
- Brand and full model number
- Error code or flashing-light sequence
- Whether the pump hums, grinds or remains silent
- Whether water reaches the sink drain
- Whether the sink also backs up
- Whether the problem followed an installation or plumbing change
- Which filters or hoses were checked
This can shorten diagnosis and reduce unnecessary part replacement.
Newly Installed Dishwasher Not Draining
A dishwasher that fails to drain on its first few cycles often has an installation problem rather than a worn-out component.
Check for:
- Dishwasher resting on the drain hose
- Kinked hose behind the cabinet
- Garbage-disposal knockout plug still fitted
- Sink-spigot or siphon blanking plug still fitted
- Missing air gap or high loop where required
- Hose routed outside the permitted height
- Loose or incorrectly placed connection
Samsung identifies a pinched drain hose and missing high loop or air gap as common installation issues. Electrolux advises checking the siphon blanking plug on recently installed or moved machines.
Contact the installer when the machine has never drained correctly.
What Different Sounds May Mean
| Symptom | Possible explanation | Next check |
|---|---|---|
| Steady humming | Pump may be obstructed or unable to move water | Filter, sump and model-approved pump area |
| Grinding or rattling | Hard debris may be near the impeller | Stop and inspect for glass or fragments |
| Pump sounds normal but water remains | Hose or sink connection may be restricted | Drain hose, air gap, spigot and sink |
| No pump sound | Cycle interruption, control fault or failed pump | Error display and professional diagnosis |
| Water returns later | Backflow, low hose routing or non-return valve issue | High loop, air gap and check valve |
| Air gap overflows | Restriction downstream of the air gap | Hose to disposal or household drain |
| Sink backs up too | Household plumbing blockage | Plumber |
These symptoms narrow the search but do not confirm a failed component by themselves.
What to Do When the Filter Is Already Clean
A clean filter does not rule out a drainage problem.
Next, check:
- Whether the sink drains normally
- Whether the disposal or sink spigot is blocked
- Whether a newly installed connection still contains a plug
- Whether the hose is kinked or crushed
- Whether the hose is routed according to the manual
- Whether dirty water is flowing back after drainage
- Whether the drain pump makes an unusual sound
- Whether a model-specific error code remains
If the accessible drain path is clear but the machine still cannot empty, further testing may be required. At that stage, likely areas include the pump, valve, wiring, sensor or electronic control.
Possible Repair Options
| Repair | Typical level | Notes |
|---|---|---|
| Cleaning the filter | Homeowner | Follow the model manual |
| Removing accessible sump debris | Homeowner | Disconnect power and watch for glass |
| Correcting visible hose kinks | Homeowner or installer | Avoid moving the appliance unnecessarily |
| Clearing household plumbing | Plumber | Appropriate when the sink also drains poorly |
| Correcting a new disposal or sink connection | Installer or plumber | Common after recent installation |
| Replacing a damaged drain hose | Technician or experienced installer | Appliance may need to be moved |
| Cleaning an approved pump cover | Model-dependent | Only when the manual provides access instructions |
| Replacing a drain pump | Appliance technician | Requires disassembly and electrical checks |
| Diagnosing wiring or control faults | Appliance technician | Do not perform live-voltage testing |
Repair prices are not included because labour rates, appliance construction, parts availability and service charges vary significantly by brand, model and country.
Drain Codes on Popular Dishwasher Brands
Drain-related codes are not universal. Always verify the code against the full model number.
| Brand | Possible drain-related indication | General meaning |
|---|---|---|
| Bosch | E23, E24, E25, E6101 or E6102 on selected models | Pump, pump cover, hose or drainage-path issue |
| Samsung | 5C, 5E and selected drain or overflow indications | Dishwasher cannot drain correctly or has detected a related water condition |
| LG | OE | Water-outlet or drainage problem |
| Electrolux or AEG | i20, C2, F2, AL6, two beeps or two flashes | Water-drainage problem on applicable models |
| Miele | F11 on selected model families | Drain fault, pump obstruction, backflow or valve-position issue |
Bosch separates some pump faults from restrictions involving the pump cover, hose or air gap. Samsung code availability varies by control-panel type. LG states that OE commonly relates to food blockage or installation. Electrolux uses several equivalent indicators across product families, while Miele’s instructions differ between dishwasher generations.
Regional Installation Differences
United States and Canada
Common terms include garbage disposal, air gap, sink tailpiece and high loop.
The disposal knockout plug is an important first check after installation. Local plumbing rules determine whether an air gap or another approved backflow arrangement is required.
United Kingdom and Ireland
Dishwashers commonly connect to a sink spigot, waste trap or siphon. A new waste connection may contain a blanking plug that must be removed before the dishwasher can drain.
Hose height and length must follow the product installation guide.
Australia and New Zealand
The basic checks remain similar: filter, sink connection, hose routing and pump symptoms. However, standard door-style dishwashers and Fisher & Paykel DishDrawer models have different internal layouts and access procedures.
DishDrawer units should be handled according to the exact drawer model’s user guide rather than instructions written for a conventional dishwasher.
Can You Use a Dishwasher That Is Not Draining?
Avoid starting another full wash when substantial water remains.
Continued use can:
- Mix fresh wash water with dirty water
- Produce odours
- Allow water to rise further
- Cause an air gap or sink connection to overflow
- Place additional load on an obstructed pump
- Hide an active leak
Do not use the appliance when:
- Water is near the door
- Water is leaking underneath
- The breaker trips
- A burning smell is present
- The pump makes loud grinding noises
- A leak-protection warning is active
- Dirty sink water is backing into the tub
When to Call a Plumber
Call a plumber when:
- The kitchen sink also drains slowly
- Water backs up in another fixture
- The dishwasher connection at the trap or disposal is blocked
- The disposal knockout or sink blanking plug needs correction
- The air gap repeatedly overflows because of a downstream blockage
- Household drain work is required
When to Call an Appliance Technician
Arrange appliance service when:
- The sink and external drain path are clear
- The pump remains silent during the drain stage
- The pump hums but cannot move water after accessible debris is removed
- The error returns after the approved checks
- The hose is damaged behind the appliance
- The pump cover or non-return valve is damaged
- Water leaks beneath the cabinet
- Electrical wiring or controls may be involved
- Major disassembly is needed
Do not bypass safety switches or attempt internal live-voltage testing.
How to Reduce Future Drainage Problems
- Remove large scraps and loose paper labels before loading.
- Clean the filter at the interval stated in the manual.
- Refit the filter and pump cover correctly.
- Keep cleaning products and stored items away from the drain hose.
- Recheck the hose after disposal, sink or cabinet work.
- Use only automatic dishwasher detergent.
- Avoid excessive detergent, which may create foam and interfere with operation.
- Deal with slow sink drainage before it affects the dishwasher.
- Record recurring error codes rather than repeatedly resetting the machine.
Frequently Asked Questions
Why is my dishwasher not draining even though the filter is clean?
The restriction may be in the drain hose, air gap, garbage disposal, sink spigot or household drain. A jammed pump, non-return valve problem or electrical fault is also possible after the external drain path has been checked.
How do I force my dishwasher to drain?
Use the model’s documented Cancel/Drain function. The required buttons vary by brand and control panel. Do not assume that a button combination from another dishwasher is correct.
Can I pour drain cleaner into the dishwasher?
No. Chemical drain-opening products can damage dishwasher components and create safety risks. Clean the accessible filter and drain path instead, or arrange professional service.
Why does water return to the dishwasher after it drains?
Water may be flowing backward because the drain hose is routed too low, the air gap is blocked, the sink drain is restricted or a non-return valve is not working correctly.
Does a humming sound mean the drain pump has failed?
Not necessarily. Humming can indicate a blocked or jammed impeller. A technician should confirm pump failure after accessible debris, the hose and the sink connection have been ruled out.
Should there be water below the dishwasher filter?
A small amount can be normal on selected models. Water covering the filter or spreading across the tub floor is more likely to indicate a restriction or failed drain cycle.
Should I call a plumber or dishwasher technician?
Call a plumber when the sink or household drain also backs up. Call an appliance technician when the household drain works normally but the dishwasher pump, wiring, controls or internal components appear to be involved.
Will resetting the dishwasher fix a drainage problem?
A reset may clear a temporary control interruption. It will not clear a blocked filter, open a plugged disposal connection, straighten a kinked hose or repair a failed pump.
Daniel Brooks is a US-based appliance troubleshooting researcher with 12 years of experience studying washer, dryer, refrigerator, and dishwasher faults. He reviews manufacturer manuals and converts technical error codes into safe, practical guidance for homeowners.