
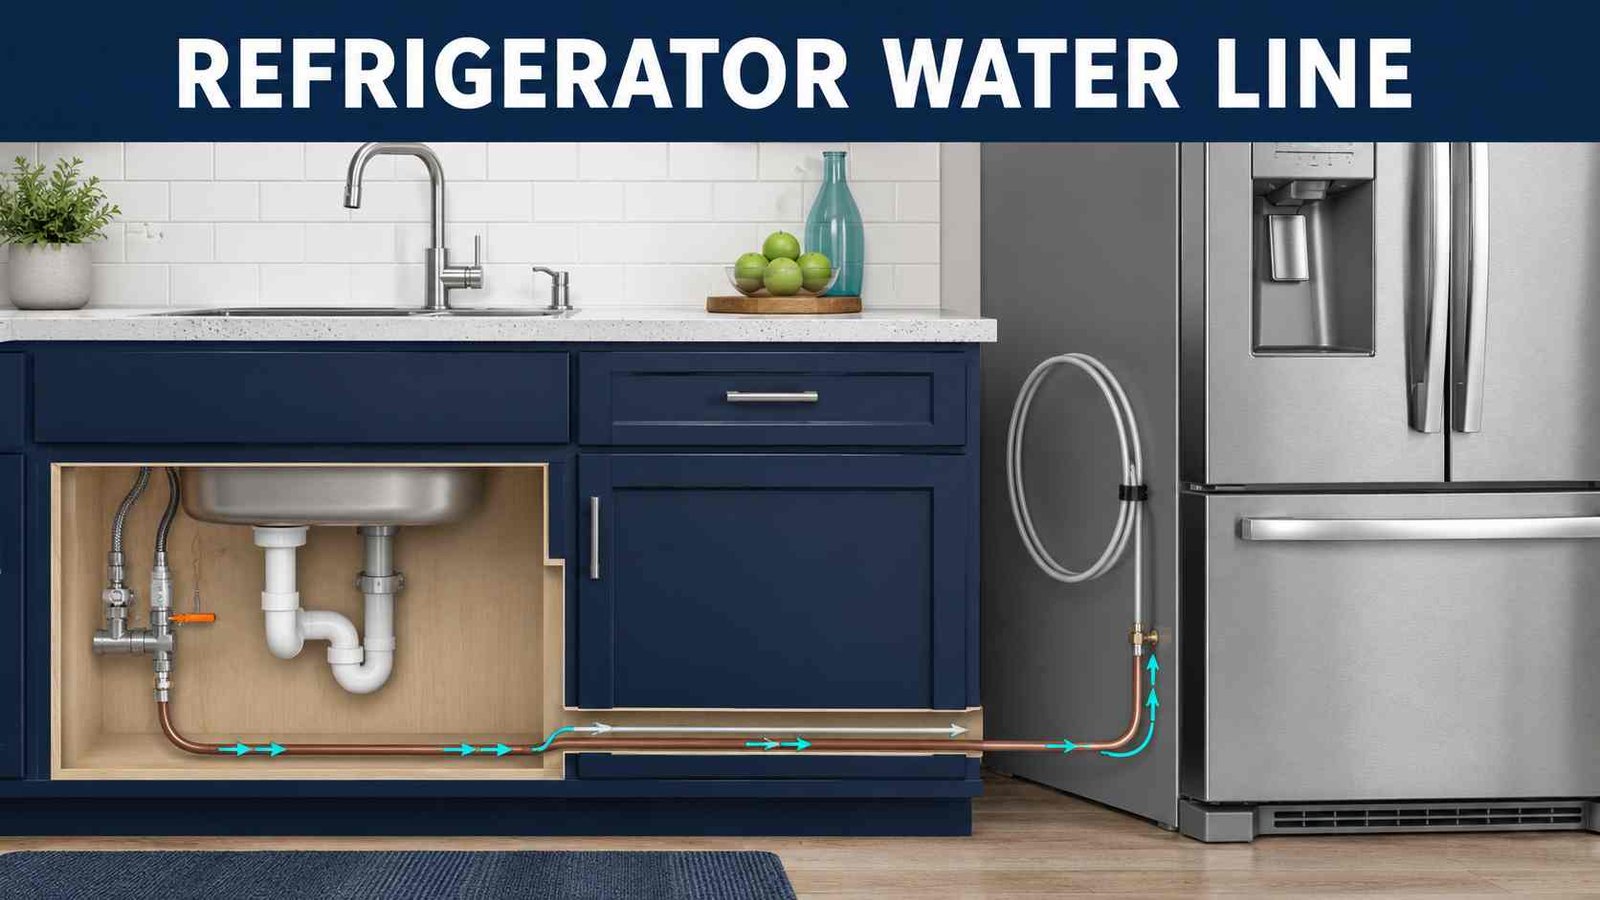
 To run a water line to a refrigerator, start with an accessible cold potable-water supply, route refrigerator-approved tubing from that supply to the back of the appliance, leave enough extra tubing for the refrigerator to be pulled forward, connect it without kinks, flush the line, and check every fitting for leaks.
For many North American refrigerators, the connection uses 1/4-inch outside-diameter tubing, but the allowed tubing material, water-pressure range, fittings, and flushing procedure can vary by model. Whirlpool, for example, permits 1/4-inch copper or PEX on applicable models, while Samsung US recommends a 1/4-inch copper installation kit.
If your kitchen already has an accessible refrigerator shutoff valve, much of the job may be manageable for a capable homeowner. If you need to cut into household plumbing, install a new branch, route through concealed walls, or work where pipes and electrical cables cannot be positively identified, use a qualified plumber instead. Whirlpool also notes that complicated routes through walls or floors may justify professional installation.
Safety note: Shut off the water supply before making connections. Unplug or disconnect power to the refrigerator while completing the water-line connection. Do not drill blindly into walls, floors, or cabinets where electrical wiring, plumbing, gas lines, or structural components may be hidden.
| Item | Typical guidance |
|---|---|
| Water source | Cold potable water |
| Common North American line size | 1/4-inch OD |
| Common tubing | Copper or PEX where approved |
| Shutoff valve | Accessible and compatible with local plumbing requirements |
| Extra tubing | Enough for a service loop and refrigerator movement |
| First test | Slowly restore water and inspect every connection |
| Before drinking | Flush according to the refrigerator manual |
| DIY difficulty | Moderate if a suitable shutoff already exists |
| Call a plumber | New plumbing branch, difficult concealed route, leaks, or uncertain local-code requirements |
Whirlpool specifies a cold-water connection and 1/4-inch copper or PEX for applicable refrigerators. Samsung US also recommends a 1/4-inch copper installation kit for its general refrigerator installation guidance.
What You Need Before Starting
The most important item is not a particular tool or fitting. It is your refrigerator’s installation manual.
Connection details differ among brands and even among models from the same brand. Samsung, for example, notes that its RS27T and RS22T refrigerators have two water lines in a model-specific arrangement. Crossing those lines can stop the water and ice functions from operating correctly.
For a typical installation where an appropriate shutoff valve already exists, you may need:
- Refrigerator-approved water tubing
- Correct compression nuts, ferrules, adapters, or manufacturer-supplied connectors
- Adjustable wrench
- Tubing cutter appropriate for the tubing material
- Bucket or container for flushing
- Clips or supports for securing the line
- Towels for checking small leaks
- Refrigerator installation manual
Do not assume a generic plumbing kit fits every refrigerator.
What Size Water Line Does a Refrigerator Use?
In the United States and Canada, 1/4-inch outside-diameter tubing is extremely common for refrigerators with ice makers and water dispensers.
Whirlpool Product Help specifies 1/4-inch, or 6.35 mm, OD soft copper or PEX for applicable models. Samsung US recommends a 1/4-inch copper tubing kit with a 1/4-inch compression nut and ferrule.
That does not make 1/4-inch tubing a universal rule worldwide. Always confirm the fitting and tubing requirements printed in the installation instructions for your refrigerator.
Copper vs PEX vs Plastic Refrigerator Water Line
The correct material depends partly on the appliance manufacturer.
| Material | Advantages | Points to check |
|---|---|---|
| Copper | Durable and widely accepted | Can kink if bent too tightly |
| PEX | Flexible and easier to route | Must be approved for the refrigerator and fitting system |
| Plastic tubing | Flexible and inexpensive | Not accepted or preferred by every manufacturer |
| Manufacturer hose | Designed for specific models | Use the correct supplied or specified fittings |
Whirlpool states that copper and PEX household connections are acceptable on the referenced refrigerator manual. Samsung US recommends copper and says a generic plastic tubing kit is not recommended, though it provides connection information for approved plastic tubing with the correct molded end.
Here’s what matters: follow the appliance manual rather than choosing tubing solely because it is easier to install.
Choose the Best Cold-Water Supply Point
A refrigerator with a plumbed dispenser or automatic ice maker normally needs a cold potable-water source.
Never intentionally connect it to the household hot-water supply. Samsung Australia explicitly instructs installers to use a cold potable-water source because connecting to hot water can interfere with the filtration system.
Common supply arrangements include an existing refrigerator shutoff, a properly installed branch near the kitchen sink, a dedicated refrigerator outlet box, or a cold-water branch brought up from a basement or crawlspace.
If there is no existing connection, creating a new branch becomes household plumbing work. Local regulations and approved valve types vary, so this is the point where hiring a plumber often makes sense.
Does the Refrigerator Need Its Own Shutoff Valve?
An accessible shutoff is strongly useful because it allows you to isolate the refrigerator without shutting down the entire house.
GE describes the refrigerator shutoff as part of the household plumbing and explains that it controls water flow to the refrigerator. Whirlpool also states that plumbing must comply with applicable plumbing codes and local ordinances.
Place or use the valve where it remains accessible for emergencies and future servicing.
Should You Use a Self-Piercing Saddle Valve?
This is one area where online installation advice can be confusing.
GE specifically says self-tapping or self-piercing saddle valves are not recommended because their small opening can restrict water flow. Restricted flow may contribute to small or hollow ice cubes and slow ice production.
Some manufacturer and retail installation material still illustrates piercing-type connections, so the safest approach is not to treat saddle valves as universally acceptable.
Check:
- Your refrigerator’s installation manual.
- Local plumbing requirements.
- The type of household pipe involved.
If a new valve must be installed onto existing household plumbing, a plumber can select an appropriate full-flow connection for your plumbing system.
Plan the Route Before Running the Tubing
Do not start feeding tubing until you know the entire path from the shutoff to the refrigerator.
The shortest route is not always the safest route.
Through Kitchen Cabinets
Running the line through the backs or lower sections of adjacent cabinets is often practical when the refrigerator sits near the sink.
Keep the tubing away from drawer slides, sharp cabinet edges, waste disposers, heat sources, and areas where stored items could repeatedly strike it.
Before drilling through any cabinet panel, inspect both sides of the drilling location.
Through the Floor or Basement
A basement or crawlspace route can work when the refrigerator is far from the sink and a suitable cold-water connection exists below the kitchen.
This type of route becomes more complicated because floor cavities can contain wiring, pipes, ductwork, and structural components.
Whirlpool advises considering professional installation where the water line has to travel a long distance or pass through floors or walls.
Through a Finished Wall
A concealed wall route may look cleaner, but it is usually the least suitable choice for an inexperienced DIY installation.
Hidden electrical cables, plumbing, inaccessible fittings, and future leak detection all become concerns.
Avoid concealing unnecessary joints inside a wall, and use a plumber when the route cannot be safely inspected.
How to Run a Water Line to a Refrigerator
These steps assume that a suitable existing cold-water shutoff connection is already available. They do not instruct you to cut into or modify household supply piping.
Step 1: Read the Refrigerator Installation Instructions
Find the exact requirements for:
- Tubing diameter
- Approved tubing material
- Connection type
- Water-pressure range
- External filter, if required
- Flushing procedure
Whirlpool expressly states that general installation guidance can differ from the requirements of individual refrigerator models.
Step 2: Shut Off the Water and Disconnect Refrigerator Power
Close the refrigerator water shutoff.
If necessary, close the household supply feeding that valve. Relieve residual pressure at an appropriate faucet.
Unplug the refrigerator or otherwise disconnect its power while making the water connection. Whirlpool’s installation procedure begins by disconnecting refrigerator power and shutting off the main water supply.
Step 3: Measure the Entire Route
Measure from the water-supply connection to the refrigerator inlet along the route the tubing will actually follow.
Do not measure only the straight-line distance.
Add enough extra tubing so the refrigerator can be pulled forward without disconnecting the line.
A current Whirlpool Canada owner’s manual tells installers of the referenced models to add 7 ft, or 2.1 m, so the refrigerator can be moved for cleaning. This is a useful example, not a universal requirement for every refrigerator.
Step 4: Route the Tubing
Feed the tubing carefully through the planned path.
Avoid:
- Sharp bends
- Pinch points
- Abrasive edges
- Hot surfaces
- Areas below freezing
- Moving drawers or hinges
- Locations where screws may later penetrate the tubing
Whirlpool says refrigerator supply tubing should be installed where temperatures remain above freezing.
Step 5: Secure the Line
Use suitable clips or supports so the tubing cannot rub repeatedly against cabinet edges or move every time a drawer or door is used.
Do not clamp flexible tubing so tightly that its internal diameter becomes restricted.
Beko’s UK installation instructions similarly show the water hose being secured to a nearby wall using the supplied clips.
Step 6: Flush the New Supply Line
Before connecting the free end to the refrigerator, place it into a bucket or sink if your manufacturer’s procedure calls for doing so.
Slowly open the supply and flush until the manufacturer’s specified condition or volume is reached.
Whirlpool’s installation instructions say to flush the supply tubing until the water runs clear before completing the refrigerator connection.
Step 7: Connect the Tubing to the Refrigerator
Use the exact fitting arrangement shown in your appliance manual.
With compression-type fittings, make sure the tubing enters the fitting squarely and avoid excessive tightening.
Both Whirlpool and Samsung warn against overtightening refrigerator water connections. Samsung specifically notes that excessive tightening can produce a leak.
Step 8: Create a Service Loop
Arrange the extra tubing behind the refrigerator in a broad loop rather than a tight coil.
The loop allows the refrigerator to be moved for cleaning or service without placing excessive force on the connection.
Whirlpool’s current Canadian manual calls for a service loop and specifically warns installers to avoid kinking the tubing. On one connection style it specifies a minimum loop diameter of 2 ft, or 61 cm. That measurement applies to the referenced installation, so check your own model instructions.
Step 9: Slowly Restore the Water Supply
Open the valve gradually.
Inspect:
- The household shutoff connection
- Any visible adapter
- The tubing
- The refrigerator inlet connection
Do not rely only on seeing a puddle. Small leaks may first appear as beads of moisture around a fitting.
Whirlpool, Samsung and Beko all instruct installers to inspect connections for leakage after opening the water supply.
Step 10: Push the Refrigerator Back Carefully
Watch the supply line while moving the refrigerator.
Do not roll a refrigerator wheel over the tubing or trap the line between the appliance and wall.
A kink can reduce water flow to the dispenser and ice maker. Whirlpool specifically tells users to check for kinks when investigating water-pressure and ice-production problems.
Step 11: Perform a Second Leak Check
Once the refrigerator is in its final position, inspect everything you can access again.
A fitting that appeared dry with the appliance pulled forward may start leaking after the tubing changes position.
How Much Extra Water Line Should You Leave?
Leave enough line for the refrigerator to come forward without stressing the inlet fitting.
For one current Whirlpool refrigerator family, the manufacturer tells installers to add 7 ft (2.1 m) to the measured distance and then form a service loop.
Do not automatically apply that exact number to every brand. Your model manual takes priority.
Too little tubing can pull against the fitting. Too much poorly arranged tubing can become kinked or trapped under the refrigerator.
What Water Pressure Does a Refrigerator Need?
There is no single correct pressure specification for every refrigerator.
Whirlpool Product Help gives 30–120 psi for certain refrigerators and directs owners to their exact installation instructions. A current Whirlpool Canada manual for another refrigerator specifies 35–120 psi. Samsung US states that its referenced ice-maker installation requires at least 30 psi.
That variation is exactly why an article should not tell every refrigerator owner that one pressure range applies universally.
If water pressure is uncertain or appears outside your model’s specification, have it checked by a qualified plumber.
How Much Water Should You Flush After Installation?
Follow the manufacturer instructions rather than using one universal number.
Samsung US tells owners using the referenced dispenser procedure to dispense one gallon before drinking the water. Beko UK tells users installing the referenced external filter to run approximately 10 glasses through it. Samsung Australia’s instructions for the referenced side-by-side system call for about 10 litres or 6–7 minutes of dispensing.
Different volumes are not necessarily contradictory. The appliances, hoses and filter arrangements differ.
Regional Differences to Know
United States and Canada
North American refrigerator instructions commonly use 1/4-inch OD tubing and compression-style connections. Copper and PEX are accepted on many Whirlpool models, while Samsung US generally recommends a 1/4-inch copper kit.
United Kingdom and Ireland
You are more likely to see the term plumbed American-style fridge freezer.
Beko UK’s installation arrangement includes a water-supply tap, external inline filter, hose, tap adapter, wall brackets and hose clips. That setup is noticeably different from the generic North American copper-tubing installation often shown online.
Australia and New Zealand
Check both appliance instructions and local installation requirements carefully.
Samsung Australia states for the referenced side-by-side installation that the water line must be connected by a qualified technician, must use a cold potable-water supply, and should use the new hose sets supplied with the appliance rather than reusing old ones.
Common Refrigerator Water-Line Installation Mistakes
Using the Wrong Tubing
A hose that physically fits is not automatically approved for your refrigerator or drinking-water installation.
Connecting to Hot Water
Use the cold potable supply specified by the manufacturer.
Leaving No Service Loop
Without slack, pulling the refrigerator forward can strain or disconnect the supply.
Kinking the Line
Tight bends can restrict flow and contribute to poor dispenser or ice-maker performance.
Overtightening Compression Fittings
Tighter is not always better. Whirlpool and Samsung both caution against overtightening.
Skipping the Flush
New tubing and filters should be flushed according to the refrigerator manufacturer’s procedure before normal use.
Pushing the Refrigerator Onto the Tubing
Always watch the line as the appliance moves into position.
Assuming Every Model Connects the Same Way
Some refrigerators use unusual arrangements. Samsung’s RS27T and RS22T, for example, use two lines that must not be cross-connected.
When to Call a Plumber
Stop the DIY installation and use a qualified professional when:
- No suitable cold-water shutoff exists
- A new branch must be added to household plumbing
- Local regulations require licensed plumbing work
- The route requires uncertain drilling through walls or floors
- You cannot positively identify hidden wiring or pipes
- The existing shutoff is seized, leaking or badly corroded
- Water pressure is outside the refrigerator’s requirements
- A connection continues leaking after correct reassembly
- The installation instructions specifically require professional installation
Whirlpool says a professional may be appropriate for long runs or routes through floors and walls, while Samsung Australia explicitly requires qualified-technician installation for the referenced water-line setup.
Frequently Asked Questions
Can you run a refrigerator water line from under the kitchen sink?
Yes, an appropriate cold-water supply near the sink can often serve a refrigerator, provided the connection, valve and tubing comply with the refrigerator instructions and local plumbing requirements. Whirlpool’s general US installation guide describes connecting through a water supply beneath the sink.
Can I run a refrigerator water line through cabinets?
Yes. Cabinet routing can be practical when the refrigerator is near the sink. Protect the tubing from sharp edges, drawers, heat and future screws, and inspect both sides before drilling.
Is PEX good for a refrigerator water line?
It can be. Whirlpool approves 1/4-inch PEX on applicable models. Other manufacturers may specify different materials, so confirm your refrigerator’s installation instructions first.
Is copper better than plastic for a refrigerator line?
Copper is accepted by many manufacturers and is Samsung US’s recommended general option. Approved PEX can also be appropriate. Generic plastic tubing should not be assumed suitable because manufacturer recommendations differ.
How far can you run a refrigerator water line?
There is no universal maximum distance that applies to every installation. A longer run increases routing complexity and potential pressure or installation concerns. Whirlpool recommends considering professional help when the line must travel a long distance.
Do I need a plumber to install a refrigerator water line?
Not necessarily when a correct, accessible shutoff already exists and the appliance manual permits homeowner installation. A new plumbing branch, difficult hidden route, persistent leak or model-specific professional-installation requirement is a good reason to use a plumber.
Can I use a self-piercing saddle valve?
Do not assume one is appropriate. GE specifically advises against self-piercing or self-tapping valves because they can restrict water flow. Check your local plumbing requirements and refrigerator instructions.
Why is my refrigerator dispenser slow after installing the line?
First check whether the shutoff is fully open, whether the tubing became kinked when the refrigerator was pushed back, whether the filter is installed correctly, and whether water pressure meets your model’s requirements. Whirlpool lists these as relevant causes of reduced flow.
Bottom Line
Running a refrigerator water line is straightforward when the kitchen already has the right cold-water shutoff and the tubing route is accessible.
The safest sequence is simple: check the manual, use approved tubing, measure with enough service slack, route without kinks, flush the supply, make the refrigerator connection, restore water slowly and inspect carefully for leaks.
The point where the job becomes household plumbing rather than refrigerator hookup is also the point where professional help becomes worthwhile. That is especially true when a new branch must be created, concealed walls or floors are involved, or the manufacturer specifically calls for qualified installation.

Daniel Brooks is a US-based appliance troubleshooting researcher with 12 years of experience studying washer, dryer, refrigerator, and dishwasher faults. He reviews manufacturer manuals and converts technical error codes into safe, practical guidance for homeowners.