
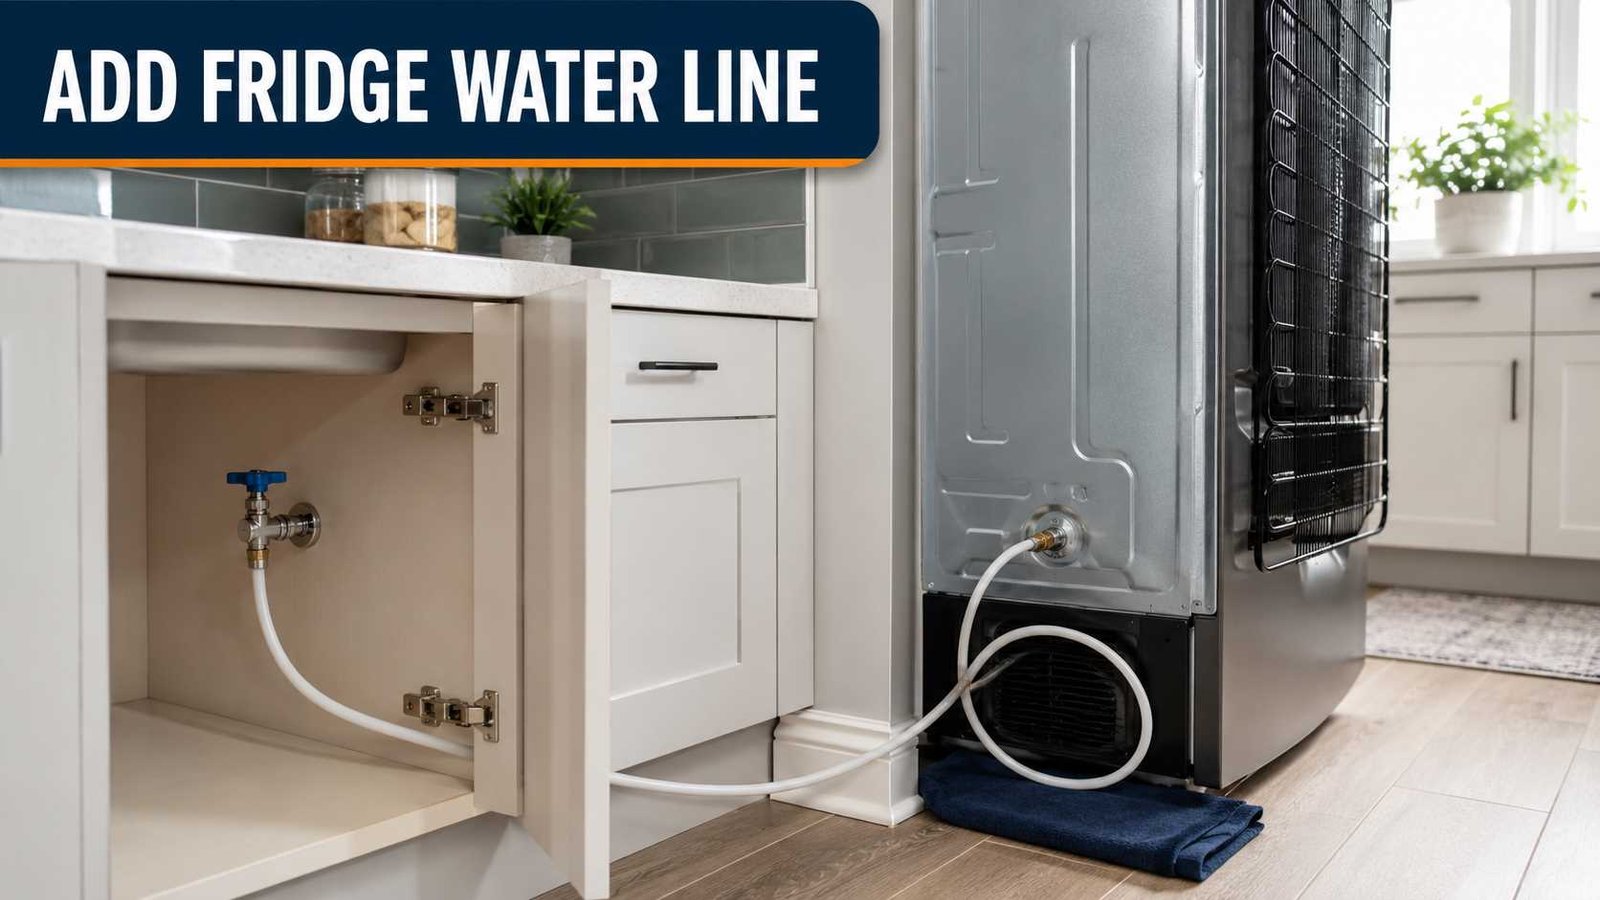
 If your refrigerator has an ice maker or water dispenser, it needs a connection to your home’s cold potable-water supply. The easiest setup is an existing refrigerator shutoff valve with approved tubing running from the valve to the appliance.
If you already have that valve, adding the line is usually straightforward: turn off the water, connect the correct tubing, flush it, attach it to the refrigerator, reopen the valve, and carefully check for leaks.
The job changes when there is no suitable water connection nearby. Cutting household pipe, adding a new valve, drilling through unknown walls or floors, or changing regulated plumbing may be work for a qualified plumber.
Most importantly, check your refrigerator’s installation manual before buying fittings. Connection types, tubing materials, water-pressure requirements, and flushing instructions vary by model.
| Item | What to know |
|---|---|
| Water source | Cold potable water |
| Common North American line size | 1/4-inch OD tubing on many models |
| Common materials | Soft copper or approved PEX; requirements vary |
| First safety step | Turn off the water and unplug the refrigerator before making the appliance connection |
| Existing shutoff valve | Usually makes the job much easier |
| No suitable valve | Plumbing modification may require a plumber |
| Before final connection | Flush new tubing until the water runs clear if instructed |
| After connection | Open the valve slowly and inspect every joint for leaks |
| Extra tubing | Leave a relaxed service loop behind the refrigerator |
| Pressure | Check the exact model manual; there is no universal refrigerator pressure range |
Whirlpool says many of its refrigerators use 1/4-inch OD soft copper or PEX between the shutoff valve and refrigerator, with enough extra tubing to form a service loop. LG likewise shows a standard 1/4-inch connection in its current US guidance but notes that the actual line or connection can differ by model.
Before You Add a Refrigerator Water Line
A few minutes of checking can prevent buying the wrong installation kit or creating a leak behind the appliance.
1. Find the refrigerator model number
Look for the model identification label inside the refrigerator compartment, around the door opening, or where your manufacturer specifies.
Then find the installation manual.
The manual should tell you:
- Required tubing or hose type
- Connection size
- Required fittings or adaptors
- Water-pressure range
- Whether an external filter or pressure device is needed
- Flushing procedure
- Any regional plumbing requirements
This matters because even two refrigerators from the same manufacturer can use different arrangements.
Samsung, for example, specifically notes that selected RS27T and RS22T refrigerators have two water lines that must be connected correctly.
2. Check whether a refrigerator shutoff valve already exists
Pull the refrigerator forward carefully and look behind it. Also check:
- An adjacent base cabinet
- Under the kitchen sink
- A nearby utility cabinet
You may find a small dedicated cold-water shutoff valve with tubing from a previous refrigerator.
If that valve is sound, accessible, and compatible with the new refrigerator, you may only need to replace or reconnect the supply tubing.
If there is no suitable valve, do not automatically start cutting household pipe. The correct way to add a branch connection depends on your plumbing system and local rules.
LG specifically recommends contacting a qualified plumber when the home’s water supply must be modified.
What Kind of Water Line Does a Refrigerator Need?
There is no single answer for every refrigerator in every country.
In North America, 1/4-inch outside-diameter tubing is very common. Whirlpool currently specifies 1/4-inch OD soft copper or PEX for applicable refrigerators. Samsung’s US guidance also describes 1/4-inch copper installation kits for many models.
But that does not mean you should buy a generic 1/4-inch kit without checking the refrigerator manual.
Copper vs PEX vs plastic vs braided hose
| Material | Useful characteristics | What to watch for |
|---|---|---|
| Soft copper | Durable and commonly specified on North American refrigerators | Can kink if bent sharply |
| PEX | Flexible and accepted by some manufacturers | Must be approved for the appliance and potable water |
| Plastic tubing | Flexible and inexpensive | Some manufacturers discourage generic plastic kits or require a molded end |
| Braided hose | Flexible and resistant to kinking | Connector type and length must match the appliance |
Samsung’s current US refrigerator guidance recommends a 1/4-inch copper kit and says ordinary plastic tubing is not its preferred option for the connection described on that page.
The correct choice is therefore the material and fitting specified for your model, not whichever hose happens to be easiest to find.
Where Should the Refrigerator Water Line Connect?
A refrigerator should normally receive cold potable water.
Do not connect it to a hot-water supply.
LG’s installation guidance specifically calls for a cold-water source and warns against using hot water.
Common arrangements include:
Existing refrigerator valve
This is the simplest setup.
The valve may be directly behind the refrigerator or in an adjacent cabinet.
Cold-water connection under the sink
A refrigerator supply may sometimes be branched from the cold-water supply serving the kitchen sink using an approved arrangement.
The exact valve or adaptor depends on the plumbing system and local rules.
Adjacent cabinet connection
Routing the line through accessible cabinets can be useful when the sink supply is nearby.
Protect the tubing from sharp cabinet edges and moving drawers.
Through a wall or floor
This can be appropriate in some homes, but the risk rises because hidden electrical cables, plumbing, gas lines, structural components, and other services may be present.
Do not drill blindly into a wall or floor.
How to Add a Water Line to a Refrigerator
The following procedure assumes you either have an existing suitable refrigerator shutoff valve or an approved water connection has already been prepared.
If the household supply itself must be altered, use the procedure supplied with the approved plumbing fitting or have a qualified plumber complete that part.
Step 1: Check the refrigerator manual
Confirm the tubing size, fitting style, water-pressure requirement, and flushing instructions.
Do this before connecting anything.
Step 2: Unplug the refrigerator
Pull the refrigerator forward carefully enough to reach the rear connection.
Unplug it before making the refrigerator-side water connection.
LG specifically includes unplugging the refrigerator in its water-line installation procedure.
Step 3: Shut off the water
Close the valve supplying the refrigerator line.
If you are working with a newly prepared supply, make sure the appropriate household water supply is shut off as required before connecting the tubing.
Keep towels and a container nearby because a small amount of water may remain in the line.
Step 4: Measure the route
Run the tubing along a protected route from the supply valve toward the refrigerator.
Avoid:
- Sharp bends
- Hot surfaces
- Pinch points
- Drawer slides
- Sharp cabinet edges
- Areas exposed to freezing temperatures
Do not cut the tubing exactly to the straight-line distance.
You need extra length behind the appliance.
Step 5: Leave a service loop
A service loop is a relaxed coil or curve of extra tubing behind the refrigerator.
It allows you to pull the appliance forward later without immediately stressing the water connection.
Whirlpool specifically recommends leaving a coil of tubing for service and cleaning.
Do not create a tight coil that kinks.
Step 6: Connect the tubing to the water supply
If you already have a compatible shutoff valve, connect the approved tubing using the fitting required by your refrigerator installation kit or plumbing connection.
Make sure the tubing enters the fitting straight.
Do not force mismatched components together.
If the valve thread, tubing diameter, or connector does not match, stop and identify the correct adaptor rather than improvising.
Step 7: Flush the new supply tubing
Before connecting the loose end to the refrigerator, place it into a bucket or large container.
Open the supply valve carefully and let water flow through the new tubing until it runs clear, following the manufacturer or installation-kit instructions.
Then close the valve again.
LG specifically tells installers to flush the tubing before connecting it to the refrigerator.
This helps remove debris that entered the line during installation.
Step 8: Connect the line to the refrigerator
Locate the refrigerator’s water inlet.
Depending on the model, you may find:
- A compression fitting
- A push-fit connector
- A short factory-installed tube
- A braided hose
- A model-specific adaptor
For a compression connection, use the nut and ferrule or fitting specified by the manufacturer.
Insert the tubing fully and keep it straight while securing the connection.
Do not overtighten.
Samsung warns that overtightening the compression nut can itself cause a leak.
Step 9: Open the water valve slowly
Restore the water supply.
Watch the supply-side connection first, then inspect the refrigerator connection.
Use a dry tissue or paper towel around each fitting. Even a very small amount of moisture deserves attention.
If you see a leak:
- Shut off the water.
- Dry the fitting completely.
- Check that the tubing is fully seated and straight.
- Confirm that the correct fitting was used.
- Reconnect according to the installation manual.
Do not leave a connection that is merely “almost dry.”
A slow leak hidden behind a refrigerator can damage flooring, cabinets, walls, and the room below.
Step 10: Reconnect power and position the refrigerator
Once the external connections remain dry, reconnect refrigerator power.
Arrange the tubing so it cannot rub against the wall or appliance and cannot be pinched as the refrigerator moves back.
Whirlpool notes that pushing a refrigerator too far against the wall can kink or pinch the water line and reduce water flow.
Move the refrigerator slowly.
Then inspect the line again.
If You Already Have a Refrigerator Water Valve
You can skip most household-plumbing work if a usable dedicated valve is already present.
The basic sequence becomes:
- Verify that the valve and tubing connection match your refrigerator.
- Turn off the valve.
- Unplug the refrigerator.
- Install the approved tubing.
- Flush the supply tubing if required.
- Close the valve again.
- Connect the tubing to the refrigerator.
- Open the valve.
- Check both ends for leaks.
- Leave a service loop before pushing the appliance back.
This is the type of refrigerator water-line installation most homeowners can reasonably consider themselves if the fittings are accessible and the manufacturer permits it.
How Much Extra Water Line Should You Leave?
Leave enough tubing to pull the refrigerator forward for cleaning or service without stretching the line.
The exact length depends on the kitchen layout.
What matters is the shape.
You want a gentle service loop, not:
- A stretched line
- A hard 90-degree bend
- A tight knot
- A line trapped under a refrigerator wheel
- A bundle pressed tightly against the wall
Whirlpool specifically recommends a service loop for this purpose.
How Much Water Should You Flush After Installation?
Follow the refrigerator manufacturer rather than using one universal number.
For example, LG’s current US water-line guide tells users to dispense at least 2 gallons through the refrigerator after installation. Samsung’s current US guidance tells users to dispense 1 gallon on applicable models.
That difference is exactly why model instructions matter.
Flushing can:
- Clear remaining air
- Remove installation debris
- Flush the refrigerator’s internal water path
- Prepare a newly installed filter
The dispenser may initially sputter as air leaves the system.
Follow your manual regarding the first batches of ice as well.
Refrigerator Water Line Connected but No Water Comes Out
A successful connection does not always mean water immediately reaches the dispenser.
Start with the external checks.
Make sure the shutoff valve is fully open
A partly closed valve can severely restrict flow.
Look for a kink
Check the entire visible route, especially directly behind the refrigerator.
Whirlpool identifies kinked supply tubing as a common cause of reduced water flow.
Check the filter
A filter that is incorrectly installed can restrict or stop water flow on some refrigerators.
Whirlpool notes that an improperly installed filter may reduce water flow, ice production, or cause other dispenser problems.
Use the filter specified for your model and install it according to the manufacturer instructions.
Allow air to leave the system
A newly connected line may contain air.
Flush the dispenser according to the refrigerator manual.
Check the required water pressure
Low pressure can produce:
- Slow dispenser flow
- Poor ice production
- Small ice cubes
- Intermittent filling
But do not assume every refrigerator needs exactly the same pressure.
Refrigerator Water-Pressure Requirements Vary
This is one area where generic installation articles can be misleading.
LG’s current general US connection guide gives 20–120 psi for the refrigerator covered by that guidance.
Samsung’s current US installation information says at least 30 psi is required for the ice maker in the models covered by its general connection guide. A recent Samsung/Dacor installation document specifies 30–125 psi for that particular refrigerator.
Some LG model manuals also distinguish between refrigerators with and without a water filter.
So the correct question is not:
What pressure does a refrigerator need?
It is:
What pressure does my refrigerator model require?
Use the model manual for the answer.
What About a Reverse-Osmosis System?
A reverse-osmosis system can reduce the water pressure available to the refrigerator.
That may affect dispenser performance or ice production when the resulting pressure falls below the appliance requirement.
LG documentation for selected models gives additional pressure requirements when an RO system supplies the refrigerator.
If your refrigerator works normally when connected directly to the household cold-water supply but struggles through an RO system, have the pressure and filtration arrangement checked rather than assuming the refrigerator has failed.
Regional Differences Matter
United States and Canada
A 1/4-inch OD copper or PEX supply is common on many North American refrigerators.
Whirlpool currently describes that arrangement for applicable refrigerators, while Samsung recommends a 1/4-inch copper kit in its US installation guide.
That still does not override the manual for your model.
United Kingdom and Ireland
Do not assume a US-style water-line kit is appropriate.
Samsung UK recommends seeking help from a qualified technician for refrigerator water-line connection and directs owners to the specific user manual.
Its current UK installation service also distinguishes between connecting an appliance to an existing water supply and making changes to the property’s plumbing.
Australia and New Zealand
Connection hardware may again differ.
For example, current Fisher & Paykel planning documentation for selected integrated models lists region-specific BSP water connections and different hose arrangements for AU/NZ and GB/EU versions. The same document warns that it is a planning guide rather than a substitute for the appliance’s installation instructions.
The practical rule is simple:
Never buy plumbing fittings solely from a generic online guide. Check the appliance’s regional installation manual first.
What If the Refrigerator Water Line Leaks?
Turn off the refrigerator water supply promptly.
Then determine where the moisture originates.
Common external possibilities include:
- Tubing not fully inserted
- Incorrect compression assembly
- Overtightened fitting
- Damaged tubing
- Cracked connector
- Kink close to a fitting
- Leaking shutoff valve
LG says leaks at the back or bottom of a refrigerator can result from a water line that is improperly connected or damaged.
Do not continue tightening a fitting indefinitely. A damaged or incorrectly assembled fitting often needs to be remade or replaced.
If water appears to come from inside the refrigerator rather than an accessible external fitting, stop the DIY work and arrange appliance service.
When Should You Call a Plumber?
A plumber is the sensible choice when:
- There is no accessible cold-water connection.
- Household pipe must be cut or permanently modified.
- A new shutoff valve must be installed and you are unsure of the permitted method.
- You cannot identify the pipe material.
- Plumbing is concealed inside a finished wall or floor.
- A valve is corroded or leaking.
- Water pressure is outside the refrigerator’s specified range.
- A reverse-osmosis system creates pressure problems.
- Local regulations require qualified installation.
- You are unsure whether a fitting is approved for potable water.
- A leak keeps returning.
The cost of professional installation is usually easier to deal with than water damage hidden behind kitchen cabinets.
Refrigerator Water Line Safety Checklist
- Confirm the refrigerator model number.
- Read the model-specific installation manual.
- Use only a cold potable-water supply.
- Confirm the required tubing or hose.
- Confirm the correct connector size.
- Check the required water-pressure range.
- Unplug the refrigerator before making its water connection.
- Shut off the water before opening a connection.
- Do not drill blindly into walls or floors.
- Avoid sharp bends and kinks.
- Flush new tubing when instructed.
- Do not overtighten compression fittings.
- Open the supply valve slowly.
- Check every connection for moisture.
- Leave a relaxed service loop behind the refrigerator.
- Recheck for leaks after moving the refrigerator into position.
- Stop if household plumbing changes exceed your experience or local rules.
Frequently Asked Questions
Can I add a water line to any refrigerator?
You can supply water only to a refrigerator designed for a plumbed ice maker, water dispenser, or similar feature. Check the model manual for its connection requirements.
A refrigerator without water-using features does not need a water line.
Does a refrigerator water line connect to hot or cold water?
Use a cold potable-water supply unless the manufacturer explicitly states otherwise.
LG’s refrigerator installation guidance specifically requires cold water and warns against a hot-water connection.
What size water line does a refrigerator use?
Many US and Canadian refrigerators use 1/4-inch OD tubing, but this is not universal.
Whirlpool specifies 1/4-inch OD soft copper or PEX for many of its refrigerators. Other models and regions may use different hoses or adaptors.
Can I connect the refrigerator water line under my sink?
Often, yes, if an appropriate approved connection to the cold potable-water supply can be made.
However, the exact tee, valve, adaptor, and installation requirements depend on your plumbing system and local regulations.
If adding that connection requires altering household plumbing and you are unsure how to do it correctly, use a qualified plumber.
Can I use PEX for a refrigerator water line?
Some manufacturers permit it.
Whirlpool currently identifies soft copper or PEX as suitable on refrigerators covered by its general water-supply guidance.
That does not mean PEX is approved for every refrigerator. Check your manual.
Why does my refrigerator have no water after I connected the line?
First check:
- The supply valve is fully open.
- The tubing is not kinked.
- The filter is installed correctly.
- The line has been flushed.
- Water pressure meets the refrigerator specification.
If those checks are good and the dispenser still gets no water, the appliance may need diagnosis.
How long does a refrigerator ice maker take to make ice after connection?
It is not always immediate.
LG’s current connection guidance says it may take up to 24 hours for the ice maker to begin producing ice after installation.
Other models may differ, so use the refrigerator manual for model-specific expectations.
Do I need a plumber to add a refrigerator water line?
Not necessarily if a suitable shutoff valve already exists and you are simply connecting approved tubing according to the refrigerator manual.
A plumber becomes much more appropriate when household plumbing must be altered, a new valve is needed, water pressure is unsuitable, pipes are concealed, or local rules require professional work.
Daniel Brooks is a US-based appliance troubleshooting researcher with 12 years of experience studying washer, dryer, refrigerator, and dishwasher faults. He reviews manufacturer manuals and converts technical error codes into safe, practical guidance for homeowners.