
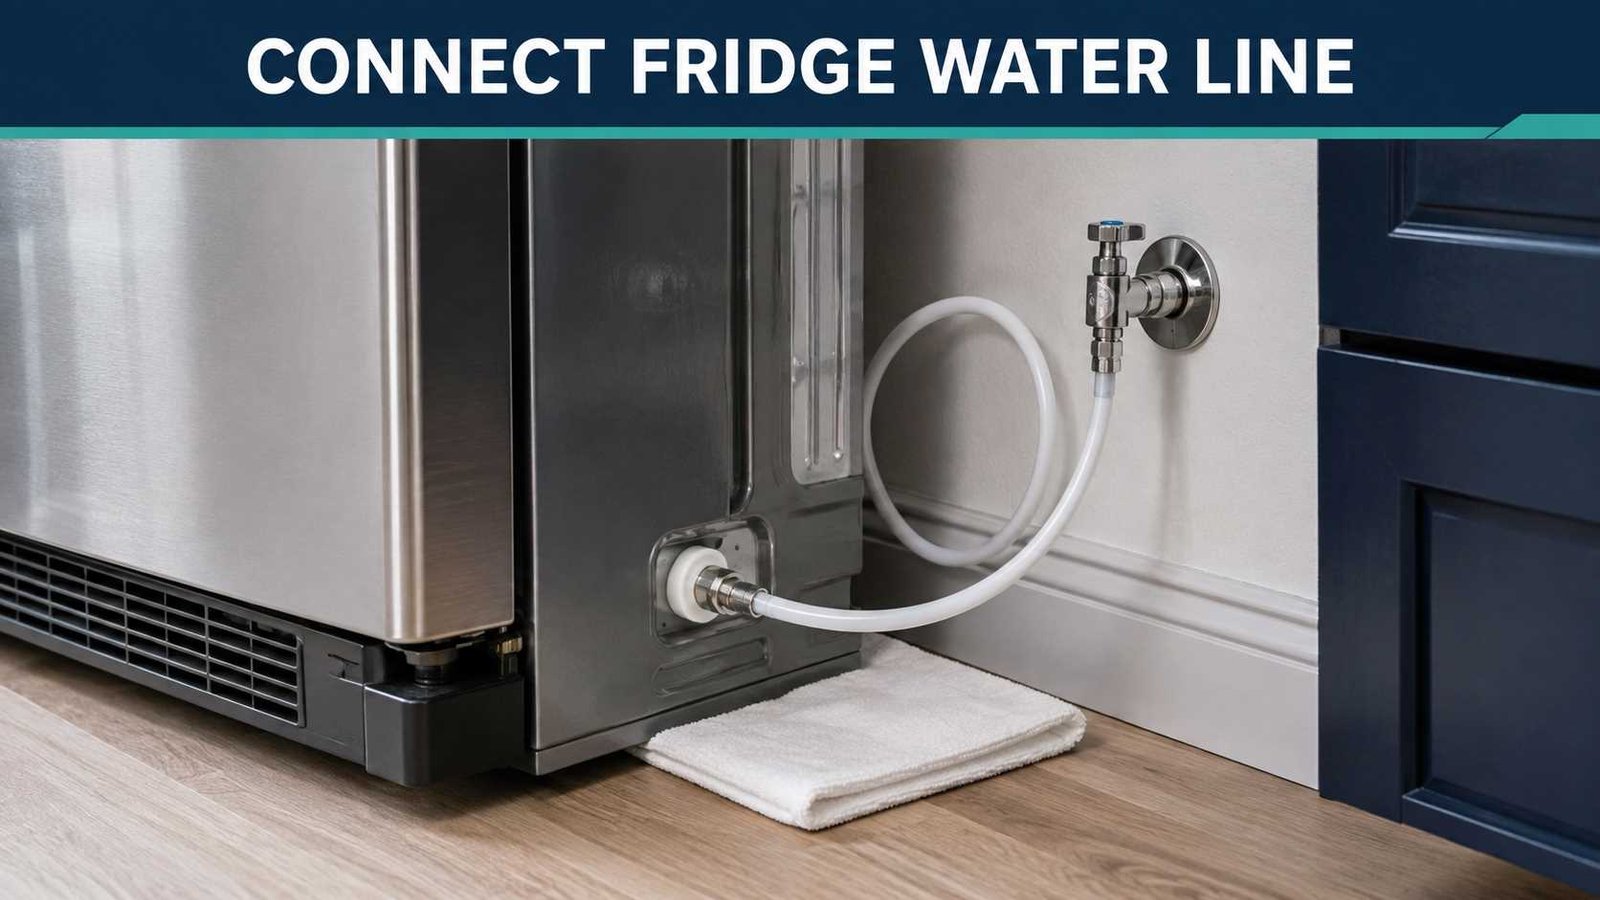
 If you need to connect a refrigerator water line, the basic job is to run an approved tube from a cold potable-water shutoff valve to the refrigerator’s water inlet. On many North American refrigerators, this is a ¼-inch copper or PEX line, but the exact tubing and connector depend on the model.
Before touching the connection, turn off the water supply and unplug the refrigerator. If you already have a suitable refrigerator shutoff valve, connecting the appliance may be a manageable homeowner job. If you need to cut into household plumbing, install a new valve, drill through hidden walls, or deal with an existing leak, a qualified plumber is the safer choice.
Do not continue using the water connection if you see an active leak.
| Question | Answer |
|---|---|
| What water supply should a refrigerator use? | Cold, potable water |
| Common North American tubing size | ¼-inch outside diameter |
| Common tubing materials | Copper or PEX on many models |
| First step | Shut off water and unplug the refrigerator |
| Should the line be flushed? | Yes, according to manufacturer instructions |
| Can the tubing be tightly stretched? | No. Leave a service loop or adequate slack |
| Should compression fittings be very tight? | Secure them, but do not overtighten |
| What should you check before pushing the fridge back? | Leaks, kinks, pinching and tubing position |
| When should you call a plumber? | When household plumbing must be modified, a valve leaks, or local/manufacturer requirements call for professional installation |
Whirlpool currently describes ¼-inch copper or PEX tubing for many refrigerator installations, while LG USA also describes a standard ¼-inch connection in its general water-line guidance. Both manufacturers tell users to consult the instructions for their exact refrigerator because connection details can vary.
Before You Connect the Refrigerator Water Line
A few minutes of checking now can prevent a flooded kitchen later.
Confirm That Your Refrigerator Is a Plumbed Model
Not every refrigerator with a water dispenser needs a household water line.
Some refrigerators are plumbed, meaning they connect directly to the home’s water supply.
Others are non-plumbed and use a refillable water tank inside the refrigerator.
LG UK, for example, sells both types. Its current installation guidance tells owners of plumbed models to use the appropriate water connector, while non-plumbed models use a removable tank instead.
If you are unsure, check the model’s installation manual before buying tubing.
Find the Refrigerator’s Installation Instructions
Do not purchase fittings based only on the refrigerator brand.
Different models can use:
- Compression fittings
- Push-fit connections
- Factory-attached tubing
- Threaded adapters
- External water filters
- Manufacturer-specific connection kits
Whirlpool specifically notes that refrigerator-side connection styles can vary by model.
Check for an Existing Shutoff Valve
Pull the refrigerator out carefully and look for an accessible cold-water shutoff valve behind or near the appliance.
You may also find a refrigerator supply valve inside a nearby cabinet or below the kitchen sink.
If an appropriate valve and line are already installed, the job is much simpler.
If there is no suitable water connection, you are no longer just connecting a refrigerator. You may be modifying the home’s plumbing system.
That is a good point to consider a plumber.
What Do You Need to Connect a Refrigerator Water Line?
The exact list depends on your refrigerator, but a typical installation may require:
- Manufacturer-approved water tubing
- Correct compression nut, ferrule or connector
- Accessible cold-water shutoff valve
- Adjustable wrench
- Container or bucket for flushing
- Dry towels for leak checks
- Tubing cutter if your instructions require one
For many Whirlpool refrigerators, ¼-inch outside-diameter soft copper or PEX tubing is specified between the shutoff valve and refrigerator. Whirlpool also recommends leaving a service loop so the refrigerator can be moved without pulling on the line.
Do not assume those specifications apply to every refrigerator.
What Size Water Line Does a Refrigerator Use?
¼-inch outside-diameter tubing is very common in North American refrigerator installations.
For example, both Whirlpool and LG USA currently reference ¼-inch tubing in their general refrigerator water-line instructions.
That does not mean every appliance worldwide uses exactly the same connection.
Your refrigerator could require:
- A different adapter
- A supplied hose
- A particular push connector
- An external filter hose
- A different valve fitting
Check the installation manual before buying parts.
How to Connect a Refrigerator Water Line to an Existing Valve
The following method applies to the common situation where an appropriate cold-water shutoff valve already exists.
Step 1: Turn Off the Water Supply
Close the shutoff valve feeding the refrigerator.
If you are working on a connection where the local valve cannot reliably isolate the supply, the main household water supply may need to be turned off.
Manufacturer guidance from Whirlpool and LG starts by stopping the water supply before making the refrigerator connection.
Step 2: Unplug the Refrigerator
Disconnect the refrigerator from power before connecting the water line.
LG and Whirlpool both include this step in their refrigerator installation guidance.
You do not need the appliance energized while working behind it.
Step 3: Inspect the Valve and Tubing
Look at the existing shutoff valve.
Stop if you find:
- Heavy corrosion
- A leaking valve stem
- Cracked tubing
- Damaged threads
- A loose valve
- An obviously unsuitable fitting
Also examine any existing refrigerator tubing.
Do not reuse a damaged line simply because it reaches the new refrigerator.
Step 4: Route the Tubing
Run the approved tubing from the shutoff valve toward the refrigerator.
The tubing should have enough extra length to let you pull the refrigerator forward later for cleaning or service.
Do not create:
- Sharp bends
- Tight folds
- Crushing points
- Excessive tension
Whirlpool recommends a service loop and warns that pushing a refrigerator too far back can pinch the supply line. A kink can reduce water flow and affect both the dispenser and ice maker.
Step 5: Connect the Tubing to the Shutoff Valve
Follow the fitting arrangement specified by your refrigerator or installation kit.
With a traditional copper compression connection, this commonly involves:
- Sliding the compression nut onto the tubing.
- Installing the compression sleeve or ferrule.
- Inserting the tubing squarely into the valve outlet.
- Tightening the compression nut securely.
Do not keep tightening simply because you want to make absolutely sure it will not leak.
Whirlpool explicitly warns not to overtighten compression connections.
PEX systems and braided refrigerator hoses can use different fittings, so follow their specific instructions.
Step 6: Flush the New Water Line
Before connecting the free end to the refrigerator, place it into a bucket or sink.
Open the water supply and let water run through the new tubing according to your refrigerator manufacturer’s instructions.
Whirlpool directs users to flush the tubing until the water runs clear before making the final connection. LG USA gives the same general instruction.
Then shut the water back off.
Flushing helps clear material introduced during installation before that water reaches the refrigerator.
Step 7: Connect the Line to the Refrigerator
Locate the water inlet on the rear of the appliance.
Its position and connection style vary.
For a compression-style connection, the procedure may involve inserting the line fully and securing it with a compression nut and sleeve.
Some refrigerators instead have an attached tube or different coupling arrangement.
LG notes that the water-line location and size can vary by model and that an adapter may be necessary when the line size differs.
Do not force a fitting that does not match.
Step 8: Turn the Water Back On
Slowly open the refrigerator water shutoff valve.
Watch the connections as the line becomes pressurized.
Check:
- The valve outlet
- Any intermediate coupling
- Refrigerator inlet
- Filter connection, if applicable
- Entire visible length of tubing
A dry paper towel placed around a fitting can make a small amount of moisture easier to notice.
Step 9: Check for Leaks
Do not push the refrigerator back immediately.
Look carefully for dripping or moisture.
LG specifically instructs users to check the completed connection for leakage after turning the supply back on. Whirlpool also requires leak inspection after installation.
If a compression fitting leaks, shut off the water before adjusting it.
If leakage continues, do not keep tightening indefinitely. The ferrule, tube end, valve or fitting may be damaged or incompatible.
Step 10: Make a Safe Service Loop
Arrange the extra tubing behind the refrigerator in a broad, relaxed loop.
You want enough tubing to pull the refrigerator forward without putting tension on the fitting.
You do not want a tightly wound bundle that immediately kinks when the appliance moves.
Then slowly move the refrigerator back while watching the line.
Do not let a wheel or refrigerator cabinet crush it.
Step 11: Plug In the Refrigerator
Once the connection is dry and secure, reconnect power.
If your ice maker was switched off during installation, follow your model’s instructions for turning it back on.
Step 12: Flush the Refrigerator Dispenser
A new connection contains air and may also contain installation residue.
Run water through the dispenser according to your refrigerator’s instructions.
The required quantity differs by brand and model.
For example, LG USA’s general instructions tell users to dispense at least two gallons after connecting the line, while Samsung Australia’s guidance for the models on its installation page calls for about 10 litres or roughly 6–7 minutes of dispensing.
That difference is exactly why your own manual should control the final flushing procedure.
Copper vs PEX vs Braided Refrigerator Water Lines
There is no single tubing type that is correct for every refrigerator.
| Type | Advantages | Things to Check |
|---|---|---|
| Copper | Long-used refrigerator supply material; holds shape | Can kink if bent sharply |
| PEX | Flexible and commonly accepted on many modern refrigerators | Use compatible fittings |
| Braided supply hose | Flexible and convenient when compatible | Confirm length and fitting type |
| Plastic/poly tubing | Used on some systems and kits | Only use where permitted by appliance instructions |
Whirlpool currently permits copper or PEX on many refrigerator models. LG also sells a braided stainless refrigerator supply line with an inner PEX tube for compatible applications.
Here’s what matters: use the tubing and connectors approved for your specific installation.
Should a Refrigerator Connect to Hot or Cold Water?
Use a cold potable-water supply unless your refrigerator documentation explicitly states otherwise.
Refrigerator ice makers and water dispensers are designed around a cold-water supply.
Samsung Australia’s current guidance specifically requires the filtering hose to connect to a cold potable-water source and warns against connecting it to hot water. LG’s refrigerator instructions similarly specify cold water.
Should You Use a Saddle or Piercing Valve?
Be careful with generic advice about saddle valves.
Some older refrigerator instructions and installation kits have used saddle-style valves. However, current Whirlpool support warns against piercing-type and 3/16-inch saddle valves, stating that they can restrict water flow and clog more easily. Whirlpool also tells users to check whether saddle valves comply with local plumbing codes.
Do not install a particular valve just because a generic refrigerator kit contains one.
Follow:
- Your refrigerator’s installation manual
- Local plumbing requirements
- The requirements of the valve and tubing manufacturer
If you need to create a new branch from the household plumbing, consider using a qualified plumber.
How to Prevent Refrigerator Water-Line Leaks
Most leak prevention comes down to a few basic habits.
Use the Correct Fittings
A connection that is almost the right size is not good enough.
Use the fitting specified by the appliance instructions.
Do Not Overtighten
Overtightening does not guarantee a better seal and can damage components.
Avoid Kinks
A kink can restrict water flow and may contribute to:
- Slow dispensing
- No water
- Reduced ice production
Whirlpool and LG both identify kinked or restricted tubing as a cause of poor water flow.
Leave Enough Tubing
The refrigerator needs to move without pulling the water connection apart.
Recheck After Moving the Refrigerator
A perfectly dry connection can become a problem if the line is pinched while pushing the appliance back.
Inspect it again after positioning the refrigerator.
Refrigerator Has No Water After Connecting the Line
A new water line does not always produce water immediately.
Check these simple points first.
1. Is the Shutoff Valve Fully Open?
A partly closed valve can limit flow.
2. Is the Tubing Kinked?
Pull the refrigerator forward and inspect the line.
3. Is the Water Line Fully Connected?
Push-fit tubing must be inserted correctly. Compression connections must be secure.
4. Is Air Still in the System?
New lines commonly contain air. Initial dispensing may sputter while the air is purged.
LG notes that air in a newly installed line can cause sputtering until the line is flushed.
5. Is the Water Filter Installed Correctly?
A poorly installed, blocked or incompatible filter can reduce water flow.
6. Does Your Water Pressure Meet the Model Requirement?
Pressure specifications are not universal.
For example, LG USA’s general connection page lists 20–120 psi for the model guidance it covers, while a Whirlpool owner manual specifies 35–120 psi for the refrigerators covered by that document.
Check your exact manual before deciding that household pressure is too low.
Refrigerator Water Line Leaks After Installation
The location of the leak tells you where to start.
| Leak location | Possible issue | Safe action |
|---|---|---|
| Shutoff valve | Loose or failing valve/fitting | Turn off supply and inspect |
| Compression nut | Poor seating or damaged ferrule | Shut off water before adjustment |
| Tubing | Split, cracked or kink-damaged tube | Replace damaged section/line as appropriate |
| Push connector | Tube not fully inserted | Reconnect according to manual |
| Refrigerator inlet | Wrong fitting or poor connection | Verify model instructions |
| Internal refrigerator area | Appliance component problem | Stop and arrange service |
If water is leaking from inside the refrigerator, behind an inaccessible panel, or from an appliance component rather than the external supply connection, stop homeowner troubleshooting.
LG notes that back-of-refrigerator leaks can result from an incorrectly connected or damaged water line.
Regional Differences Matter
United States and Canada
¼-inch copper or PEX tubing is common in manufacturer instructions for North American refrigerators. Local plumbing codes still apply.
United Kingdom and Ireland
Terminology often uses plumbed fridge freezer rather than simply refrigerator water-line hookup.
LG UK advises owners of plumbed models to unplug the appliance, use the correct connector for the valve type and check for leaks and steady water flow.
Australia and New Zealand
Do not assume North American DIY advice applies.
Samsung Australia’s instructions for the refrigerators covered by its support page explicitly state that the water line must be connected by a qualified technician.
Always follow the regional manual supplied for your appliance.
When Should You Call a Plumber?
Connecting a refrigerator to an existing, suitable valve can be simple.
Creating the water supply itself is another matter.
Call a qualified plumber or installer when:
- No refrigerator shutoff valve exists
- Household water piping needs modification
- The existing valve leaks or is heavily corroded
- You have water hammer or banging pipes
- A line must be routed through walls or floors
- You are unsure whether a valve complies with local code
- Water pressure is outside your model’s requirements
- The connection continues leaking after correct installation
- Manufacturer instructions require professional installation
LG USA specifically recommends a qualified plumber if the home’s water-supply arrangement must be modified.
Refrigerator Water-Line Safety Checklist
Before you finish, confirm all of these:
- Refrigerator manual has been checked
- Refrigerator is a plumbed model
- Water source is cold and potable
- Correct tubing has been used
- Correct fittings have been installed
- Tubing has been flushed
- Refrigerator-side connection is secure
- No fitting has been excessively tightened
- Water valve is fully open
- No visible leaks are present
- Tubing has no kinks
- A service loop or adequate slack remains
- Tubing will not be crushed behind the refrigerator
- Dispenser has been flushed as required by the manual
- Connection has been rechecked after positioning the refrigerator
FAQs
Can I connect a refrigerator water line myself?
Possibly, if an appropriate refrigerator shutoff valve already exists and your manufacturer’s instructions allow homeowner installation. Creating a new connection to household plumbing is more complicated and may require a plumber or qualified installer.
Regional rules also matter. Samsung Australia, for example, requires professional water-line connection for the refrigerators covered by its support instructions.
Does the refrigerator water line connect to hot or cold water?
It normally connects to a cold potable-water supply. Do not connect a refrigerator water system to a hot-water pipe unless your manufacturer explicitly specifies such an arrangement.
What size water line is used for a refrigerator?
¼-inch outside-diameter tubing is common on North American refrigerators. Whirlpool and LG both reference it in current support material, but you should verify your model before buying tubing or fittings.
Can I use PEX for a refrigerator water line?
Many refrigerators can use PEX. Whirlpool, for example, specifies copper or PEX for a number of current installation configurations. Compatibility still depends on the appliance and fittings.
Why is my refrigerator water dispenser sputtering after installation?
Air is usually present in a newly installed supply line. It may cause sputtering while you flush the system. Follow the model’s required flushing procedure.
Why is water flowing slowly after I connected the refrigerator?
Check that the shutoff valve is fully open and that the tubing is not kinked or crushed. Also check the water filter and your refrigerator’s water-pressure requirements. Whirlpool and LG both identify line restrictions as a common cause of reduced flow.
How tight should the refrigerator water-line fitting be?
It should be secure and leak-free, but compression fittings should not be overtightened. Whirlpool’s installation instructions explicitly caution against overtightening.
How much extra water line should I leave behind the refrigerator?
Leave enough slack for the refrigerator to move forward without putting tension on the connection. The exact amount can vary by model and installation. A broad service loop is preferable to a sharp bend or tightly stretched tube.
Daniel Brooks is a US-based appliance troubleshooting researcher with 12 years of experience studying washer, dryer, refrigerator, and dishwasher faults. He reviews manufacturer manuals and converts technical error codes into safe, practical guidance for homeowners.